Hey there, all you aspiring LinkedIn stars! If you’ve ever wondered how some people just seem to have that perfect LinkedIn profile picture with the ideal lighting, you’ve landed on the right blog post. In today’s digital-first world, your LinkedIn profile is like your online business card. Just imagine showing up to a networking event and handing out a crumpled card—yeah, not the best impression. We’re here to make sure your LinkedIn photo screams “professional,” but not “stiff”—and a spot-on studio lighting setup for LinkedIn images is all you need. So, let’s dive right in!
Read Now : Efficient Watermarking Algorithm Development
Mastering the Art of Lighting
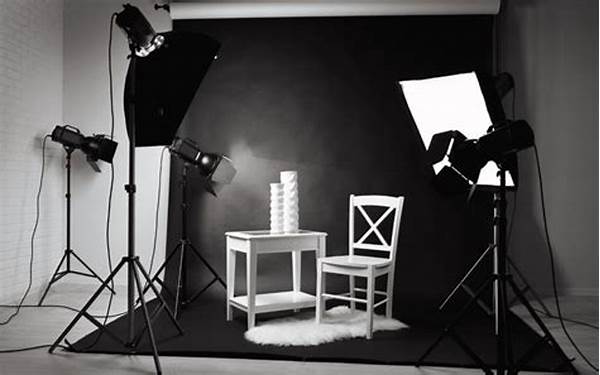
Setting up the studio lighting for LinkedIn images isn’t rocket science, my friends, but it does require some finesse. First thing’s first, opt for a three-point lighting setup. This involves the key light, which will be your main source of illumination. It should be positioned to one side of your subject’s face. Next, there’s the fill light, which is like the key light’s supportive bestie—position it on the opposite side to erase those pesky shadows. Finally, the backlight adds depth, making the subject pop a bit more from the backdrop. These elements together create a balanced, flattering photo that’s LinkedIn-worthy.
Using natural light is just fine if you’re on a budget, but let’s be honest—nothing beats a controlled studio environment. When configuring a studio lighting setup for LinkedIn images, make sure your lights are soft, not harsh; nobody wants to look like they’re taking DMV photos. Play around with diffusers to soften the light, ensuring a natural glow that highlights the best features while minimizing any overexposures or shadows. Trust me, once you find that sweet spot, your LinkedIn image will practically invite opportunities to slide right into your DM… metaphorically speaking.
Now, onto the backdrop. A well-chosen background complements your studio lighting setup for LinkedIn images. Neutral colors work wonders here as they won’t distract from the main event—you. Steer clear of potentially clashing or loud colors that detract from your polished look. Your photo should exhibit confidence; your backdrop, simplicity. With the right lighting and background, you’ll achieve a LinkedIn image that suggests not just professionalism but also approachability and warmth. Remember, this isn’t just a photo; this is your personal brand we’re talking about!
Quick Tips on Studio Lighting Setup
1. Key Light Position: Always start with the key light for your studio lighting setup for LinkedIn images. Position it slightly above and at an angle for optimum lighting.
2. Use Diffusers: Attach diffusers to your lights for softness and to eliminate harsh shadows in your studio lighting setup for LinkedIn images.
3. Fill Light Magic: Employ a fill light to neutralize shadows cast by the key light, crafting a balanced look in your studio lighting setup for LinkedIn images.
4. Backlight Benefits: Never underestimate the backlight in your studio lighting setup for LinkedIn images; it adds a polished depth to photos.
5. Natural Light Tactics: If going au naturel, ensure windows are side-facing, casting even natural light during your studio lighting setup for LinkedIn images.
Importance of Lighting in Professional Photos
Let’s have a real chat about why lighting is so critical in professional photos, particularly when it comes to LinkedIn. Your profile picture is often the first impression someone gets, and like it or not, people tend to judge a book by its cover. A well-executed studio lighting setup for LinkedIn images can truly elevate how others perceive you and your brand. Good lighting helps in drawing attention to your face and giving a more open, trustworthy appearance. I mean, who doesn’t want to look like someone others would entrust their business with?
On top of creating a professional vibe, the right lighting setup enhances your natural features and can uplift your whole look. It isn’t just about standing in front of a camera with a smile—it’s a strategic move to project professionalism through visuals in your studio lighting setup for LinkedIn images. Exposure is everything, and when the lighting is right, your photo not only stands out but also conveys that you take your career seriously, ensuring you’re remembered for all the right reasons.
Plus, looking approachable and polished in your LinkedIn profile can make a world of difference. Whether you’re hunting for a new job or trying to make connections in your industry, that polished image can make you seem more accessible and ready for collaboration. The studio lighting setup for LinkedIn images contributes to that first impression—because let’s be real, nobody wants to work with someone who’s got a dimly lit, grainy photo as their professional headshot.
Essential Steps for Perfect Lighting
Alright, setting up the perfect studio lighting setup for LinkedIn images isn’t all glitz and glamour—it’s a series of strategic steps. Here’s a quick breakdown:
1. Choose a Neutral Background: Simplicity is key to ensure the focus remains on you during your studio lighting setup for LinkedIn images.
2. Select Quality Equipment: Invest in good lighting gear. Trust, it makes a world of difference in your studio lighting setup for LinkedIn images.
3. Experiment with Angles: Sometimes the best angle isn’t the first you choose; play around with your studio lighting setup for LinkedIn images until you find the best one.
Read Now : Budget-friendly Wedding Photography Options
4. Test the Light Levels: Before you hit, “cheese”, check how the light levels affect your appearance in the studio lighting setup for LinkedIn images.
5. Utilize Reflectors: Reflectors can help to bounce light back onto your face, enhancing features.
6. Mind Your Posture: Lighting is essential, but so is the subject’s stance; maintain a naturally relaxed posture.
7. Camera Settings Matter: Familiarize yourself with basic camera settings to ensure they complement your lighting.
8. Take Test Shots: Before any final captures, take a variety of test shots to troubleshoot and fine-tune your lighting.
9. Fine-tune Positioning: Continuously adjust the positions of your lights; even minor tweaks can make a substantial impact.
10. Seek Feedback: After your session, feedback is golden. It helps perfect future studio lighting setups for LinkedIn images.
Final Lighting Strategies for Success
Okay, so here’s the scoop. When you’re crafting that perfect studio lighting setup for LinkedIn images, there’s an art and science blend here. It’s like brewing your own coffee, mixing just the right amount of artful beans with the exact water temperature. First, always start with good equipment—there’s no substitute for reliability. Then, consider three-point lighting your new best friend. It’s the holy grail for professional quality studio lighting that makes you look amazing. Properly placed, these lights smooth all the little imperfections and enhance your natural features, turning your headshot into a scroll-stopper.
Next, it’s all about those finishing touches. Experiment with putting a little pop behind you with a backlight or even just tweaking the light temperature for a more flattering skin tone. Your lighting approach should harmonize with your backdrop, creating a vibe that’s clean, professional, and elegant. Lastly, keep testing, retesting, until you strike gold with that perfect balance in your studio lighting setup for LinkedIn images. You want that image to whisper confidence, approachability, and competency, making anyone viewing it think, “Wow, I need this person on my team. Like, yesterday.”
Casual Light Talk
Yo, so let’s spill the tea on why this whole studio lighting setup for LinkedIn images thing is a big deal. Can you imagine pulling up to an interview in crusty old jeans? Exactly. Your LinkedIn photo’s gotta be on point, ‘cause first impressions matter, peeps. Lighting is like the MVP, the secret sauce that makes you go from “meh” to “yeah!” It’s your image glow-up on a silver platter. Like, trust me, getting that perfect lighting balance brings out your best features, shadow ninja-style.
And get this, it’s not just about looking fly—nope. It’s about projecting confidence and that hustle-driven vibe. Good lighting equals a solid foundation for your professional brand. So, ready to take that LinkedIn game up a notch? Get your lighting right, and before you know it, you’ll be closing deals and building networking empires. Stay lit, folks!
The Wrap on Lighting and LinkedIn
To boil it all down, a proper studio lighting setup for LinkedIn images isn’t just about creating a nice photo—it’s an essential strategy in voicing your professional persona without words. Great lighting captures not just how you look, but an essence of how competent and ready for opportunities you are. Trust this: having the right lighting is a game-changer.
From starting out with a three-point lighting system to ensuring you’ve meticulously arranged every element, applying these techniques will have you winning over new contacts and nabbing that job interview in no time. The secret is in the finesse of your studio lighting setup for LinkedIn images—so you might as well practice it till perfection. After all, an image isn’t worth a thousand words if it doesn’t have the right lighting!