Hey there, lovely readers! Welcome back to my cozy corner of the internet. Today, we’re diving into the magical world of photo retouching with a touch of creativity and a dash of humor. It’s time to roll up those sleeves and let’s get into the nitty-gritty of turning your photos into masterpieces with our step-by-step retouching guidance. Trust me; it’s simpler than you think!
Read Now : “free High-quality Animal Images”
Understanding the Basics of Photo Retouching
Alright, folks, let’s start with the fundamentals of our step-by-step retouching guidance. First things first, knowing your tools is key. Most photo editing software offers a variety of features that can transform any picture from dull to dazzling with just a few clicks. Understanding what each of these tools does can make a huge difference in the final product. It’s like having a magic wand – but for photos.
Before you start retouching, always remember to keep your original image safe. You never want to lose your baseline or make changes you can’t undo. Trust me, you’ll thank yourself later when you accidentally overdo that retouch. With your original image tucked safely away, you’re free to unleash your creativity while always having a backup in case things go awry.
And here’s a pro tip: Take your time! Retouching is an art, and rushing through it won’t do justice to your vision. Ease into the process, and carefully examine every detail of your image. Remember, this is your creative journey, so enjoy every single step of it. It’s amazing what a little color correction or slight blur can do to enhance an image.
Key Steps in Retouching Photos
1. Get to Know Your Tools
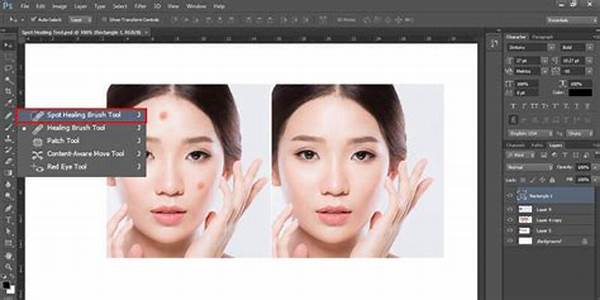
Our step-by-step retouching guidance begins with familiarizing yourself with the software. Tools like the healing brush, clone stamp, and color correction options are essential in creating those Instagram-worthy pictures.
2. Establish Your Goal
Before plunging into retouching, determine the aesthetic you’re aiming for. Whether it’s a vintage look or high-definition clarity, having a clear vision ensures your step-by-step retouching guidance aligns perfectly with your goals.
3. Preserve the Origination
Never alter the original image directly. Always work on a copy. This step-by-step retouching guidance prevents any irreversible blunders, giving you peace of mind as you work your magic.
4. Working with Layers
Utilize layers to manage different elements in your photo seamlessly. Step-by-step retouching guidance using layers allows you to make adjustments without disturbing other parts of the image.
5. Know When to Stop
One of the biggest challenges is knowing when your image is just right. Trust your instincts and the guidance from our step-by-step retouching guidance to not overdo it. Sometimes less truly is more!
Advanced Techniques for Photo Perfection
Taking your photography to the next level requires a deeper dive into advanced retouching techniques. This step-by-step retouching guidance is not complete without exploring aspects like frequency separation and dodging and burning. These techniques sound fancy, but they are pretty cool ways to play with textures and lighting.
Frequency separation allows you to retouch the fine details of your image without impacting the colors. Meanwhile, dodging and burning adds depth by altering light and shadows. While these might sound complex at first glance, with a bit of practice, you’ll find them indispensable tools in your retouching arsenal.
Remember, each edit you undertake teaches you something new. Even if the first few attempts are not perfect, keep practicing. Like learning to ride a bike, once you master these techniques, you’ll be riding with confidence. Trust in this step-by-step retouching guidance and keep pushing forward!
Comprehensive Overview of Step-by-Step Retouching Guidance
1. Crop Mindfully
This step-by-step retouching guidance reminds you that cropping can significantly alter the focus of an image, so do it wisely to enhance the subject.
2. Light Adjustment
Carefully adjust the lighting to bring out the best in your photo. Too much or too little can make a huge difference.
3. Color Choices
Use color correction to eradicate unwanted hues that might distract from the main focus of your image.
4. Refine Texture
Smooth out textures gently to maintain a natural look while removing distractions like skin blemishes.
Read Now : Overcoming Portrait Subject Anxiety
5. Enhance Details
Step-by-step retouching guidance suggests using sharpness sparingly to bring out the fine detail without causing harsh edges.
6. Use Presets Cautiously
Presets are fantastic but rely on this step-by-step retouching guidance to ensure that they enhance rather than overpower your images.
7. Experiment with Tools
Never shy away from exploring new tools. Sometimes, experimenting leads to unexpected wonders!
8. Stay True to Your Style
Every edit should reflect your unique style and vision.
9. Feedback Is Key
Share with friends or fellow photographers for valuable insights and different perspectives.
10. Keep Refining
Continuously improve your craft and step-by-step retouching guidance with every image edited.
Mastering the Art of Retouching
Alright, folks! Let’s take a deep dive into mastering this fantastic art form with our step-by-step retouching guidance. Starting with the basics is crucial, but adding your unique flair and creativity can elevate your photos from good to downright amazing. It’s almost like discovering a superpower after every click and edit.
Incorporate your style in each photograph, letting it shine through every corrected hue and adjusted brightness. The process is as much about your vision as it is about the technicalities involved. Never hesitate to put your personal touch or experiment with new techniques that you haven’t tried before. Remember, the beauty of retouching lies in both its scientific and creative elements.
While it’s easy to get lost in the vast sea of editing tools and techniques, remember to keep true to what your heart tells you. Whether it’s making a smile brighter or bringing out the texture in waves, let each edited piece narrate a story. Following a structured set of guidelines ensures your images pop, but always leave room for your creative intuition to guide the process. With enough practice and a bit of patience, you’ll become a retouching pro in no time!
Get Creative with Photo Retouching
Hey peeps, let’s talk creativity! When it comes to step-by-step retouching guidance, there’s ample room for adding unique twists and personal touches. The idea is to have fun and not to shy away from experimentation. No one’s stopping you from pushing the boundaries of traditional retouching.
Play around with colors, and transform the mundane into masterpieces with bold hues. Dive into the various texturing options. The objective? To redefine how things appear from mundane to magic. Throw a splash of vibrant color here, adjust the shadows there, and see how new life breathes into those photos!
Remember, while steps can guide you, creativity breaks the mold. So, stay curious and enthusiastic. Let your imagination run wild with our step-by-step retouching guidance, and trust me, results will be mind-blowing! As you explore different shades and angles, you’ll soon find your unique voice in photo editing.
Wrapping Up the Retouching Journey
As we wrap up this fabulous retouching journey, I hope this step-by-step retouching guidance has inspired you to pick up those digital brushes and get creative. We’ve covered a lot today, from understanding the basic tools to experimenting with advanced techniques. The beauty of retouching lies in its transformative power and the creativity it unleashes within you.
Remember, practice makes perfect! With each photo you retouch, you’ll learn something new, refining and perfecting your skills. Over time, what initially seemed like a daunting task will become second nature, allowing you to weave magic into your digital masterpieces. And remember, every good retoucher knows the importance of knowing when to stop, so take your time and trust your instincts.
In the end, retouching is all about enhancing what’s already there and making it shine in the best possible light. With this step-by-step retouching guidance, I believe you’ll find not only confidence but a love for making your photos sparkle. Keep exploring, keep editing, and always stay inspired!