Hey there, creative souls! Today, we’re diving into the enchanting world of DIY photoshoot backdrops. Whether you’re a budding photographer or simply want to spice up your Instagram game, creating your own backdrop is a fun and rewarding project. So grab your favorite crafting tools and let’s embark on this artistic journey together!
Read Now : Key Principles Of Content Editing
The Art of Creating Step-by-Step DIY Photoshoot Backdrops
Creating a step-by-step DIY photoshoot backdrop is not just about making something pretty to stand in front of; it’s about embracing your creativity and personal style. The beauty of a DIY project is that you can customize it to your heart’s content, making it as elaborate or as minimalist as you desire. Start by gathering inspiration from your favorite magazines, Pinterest boards, or even nature itself.
Once you have a vision in mind, it’s time to gather materials. Think outside the box here – anything from colorful fabrics and paper to flowers and fairy lights can become part of your masterpiece. Don’t be afraid to mix textures and play with colors! Next, set up a workspace where you can fully immerse yourself in the creative process without distractions.
As you start constructing your backdrop, remember that trial and error are all part of the fun. Your step-by-step DIY photoshoot backdrop doesn’t need to be perfect; it just needs to reflect you. Take your time, enjoy the process, and don’t be afraid to make adjustments along the way. After all, the best art comes from a place of passion and individuality. And who knows? You might even discover a hidden talent for scene design!
Quick Tips for Step-by-Step DIY Photoshoot Backdrops
1. Mood Boards: Start with mood boards to visualize your step-by-step DIY photoshoot backdrops. Mix textures, colors, and styles for inspiration.
2. Backdrop Basics: Gather essentials: fabric, paint, and tools. Simplicity or extravagance is up to you!
3. Crafty Confidence: Approach your design boldly! Your step-by-step DIY photoshoot backdrops should scream creativity.
4. Lighting Magic: Enhance your setup with natural or DIY lighting. Perfect lighting highlights your amazing backdrops.
5. Finish and Flair: Add the final touches to your step-by-step DIY photoshoot backdrops. Finesse your look with props or accents.
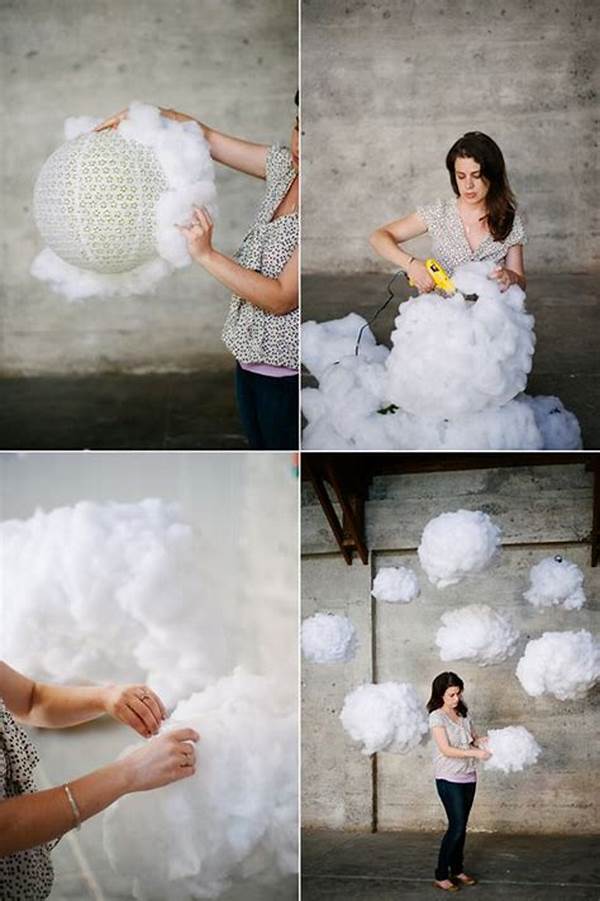
From Fabric to Flash: Step-by-Step DIY Photoshoot Backdrops Unveiled
Alright, let’s dive a bit deeper into the exciting process of building your backdrop. The first step is selecting the right fabric or base material — it’s like picking a canvas. Think about how the colors and patterns will play against the lighting and the subject you’ll be capturing. When starting your step-by-step DIY photoshoot backdrops, don’t shy away from bold options, like a deep velvet for a touch of luxury or a rustic burlap for a cozy, earthy vibe.
Once your base is ready, the next move is all about creativity. Think layers, think dimensions. Maybe you attach some sheer curtains for a whimsical touch or hang an assortment of vintage frames for an eclectic look. With step-by-step DIY photoshoot backdrops, you’re not just following instructions; you’re crafting an experience. Remember, a truly stand-out backdrop has those little details that catch the eye and hold attention. Even a simple string of fairy lights can transform the ordinary into something magical.
Transform Ordinary Spaces with Step-by-Step DIY Photoshoot Backdrops
1. Identify Your Space: Begin your step-by-step DIY photoshoot backdrops by scouting the perfect location. Consider light and space availability.
2. Theme Selection: Define the theme for your backdrops. Whether it’s bohemian, vintage, or modern, clarity is key!
3. Material Matters: Choose materials that match your theme; think paper, fabric, or repurposed items.
4. Color Coordination: Select a color palette that complements your theme and highlights your subject.
Read Now : Adorable Baby Photo Session Themes
5. Layered Textures: Incorporate different textures to add depth and interest to your backdrops.
6. Prop Potential: Add props to create a rich and dynamic scene for your photoshoots.
7. Lighting Adjustment: Use reflectors or natural light to enhance your DIY backdrop setup.
8. Height and Dimension: Elevate sections to create layers, adding visual intrigue.
9. Stability Check: Ensure all elements of your backdrop are securely fastened, especially in outdoor setups.
10. Final Flourishes: Add personal touches like fairy lights or foliage to make your step-by-step DIY photoshoot backdrops truly unique.
Capturing Creativity: Step-by-Step DIY Photoshoot Backdrops in Action
Who knew creating step-by-step DIY photoshoot backdrops could be this thrilling, right? Once everything is set up and ready, it’s time to capture the magic. Imagine your backdrop — a handmade masterpiece glistening in the ambient light. Step in front of it, and suddenly, it feels like you’re on a professional set. Each photo tells a story, your story, thanks to the personal touch you’ve added to the scene.
If you’re photographing friends or models, they’re going to love the unique environment you’ve created. Feel free to play around with angles, perspectives, and poses to get the most out of your backdrop. A step-by-step DIY photoshoot backdrop is more than just decoration; it’s an opportunity to bring your artistic vision to life in each snapshot. Don’t forget to have fun with it — spontaneity often leads to the best shots!
Breaking Down Creative Walls with Step-by-Step DIY Photoshoot Backdrops
Okay, let’s chat a bit about the real deal behind making these bad boys. When you’re in the groove of building your step-by-step DIY photoshoot backdrops, it’s like you’re unlocking a whole new world of creativity. It’s not just crafts and glue; it’s about breaking down barriers and expressing yourself in ways Instagram filters never could.
Having a day full of trial and error will teach you so much. There’s nothing quite like the satisfaction of seeing your vision come to life, even if there are a few hitches along the way. Each mistake? Just a stepping stone in your artistic journey. Plus, there’s nothing better than getting those perfect shots, knowing you put your heart and soul into every inch of the backdrop. It’s all about putting your personal spin on things and making art that’s authentically you.
Wrapping Up: The Magic of Step-by-Step DIY Photoshoot Backdrops
To sum it up, crafting step-by-step DIY photoshoot backdrops is all about blending imagination with practicality. It’s the perfect outlet to express your personal style while enhancing your photography skills. Every backdrop you create is a testament to your creativity and willingness to experiment and explore new boundaries with every material you choose.
Before you know it, you’ll be crafting backdrops like a pro, impressing friends, clients, or simply yourself with the little worlds you can create from scratch. So next time you pick up that camera, remember: a bit of craftiness can turn a simple photo into a breathtaking work of art. Here’s to your next creative adventure, full of color, depth, and unique touches — all made possible by the power of step-by-step DIY photoshoot backdrops!