Hey there, fellow photography enthusiasts! If you’re diving into the world of portrait photography, you know the importance of having flawlessly smooth skin in your images. Lightroom, with its powerful tools, offers a fantastic way to enhance your subject’s complexion without making them look like a wax figure. Let’s chat about some cool skin smoothing techniques in Lightroom that can elevate your editing game to a whole new level!
Read Now : Free High-res Picture Archive
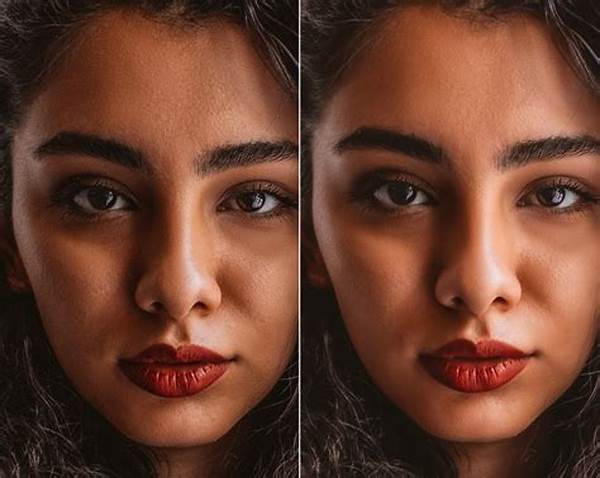
Basic Skin Smoothing Techniques in Lightroom
Alright, first things first! If you’re just starting, don’t worry, we’ve all been there. Lightroom is a friendly and intuitive platform that makes skin editing less of a daunting task. Begin by using the Adjustment Brush feature. This tool lets you apply specific adjustments just to the skin areas you want to smooth out. Think of it as your digital makeup brush!
Next, focus on lowering the clarity. Reducing clarity will soften up any imperfections or rough spots, giving that dreamy, smooth finish. But hey, remember that less is more. You don’t want to lose all texture and make the skin look unnatural. Finally, always keep an eye on the effect using the before and after views. It’s pretty awesome to watch the transformation happen right before your eyes. By mastering these basic steps, you can achieve stunning skin smoothing techniques in Lightroom effortlessly.
Quick Tips for Skin Smoothing Techniques in Lightroom
1. Use Adjustment Brush: This baby is your go-to for precise edits. It’s perfect for targeting those fine areas on the skin.
2. Reduce Clarity: Instant smoothness boost! Just a tad reduction can make a big difference.
3. Soften with Sharpness: Often underrated, reducing sharpness can help in giving that silky finish.
4. Take Advantage of Presets: There are tons of presets available that cater specifically to skin smoothing techniques in Lightroom.
5. Zoom In and Out: Double-check your work by zooming. It’s all in the details!
Advanced Techniques for Flawless Skin
Now that you’re comfortable with the basics, why not push it further? Advanced skin smoothing techniques in Lightroom involve using the Split Toning feature. It sounds fancy, right? Split Toning can help balance the skin tones and add warmth or coolness. This step is crucial in keeping skin tones from looking too pink or orange after smoothing.
Moreover, learning the nuances of the Detail Panel can elevate your edits. By fine-tuning the noise reduction and sharpening settings, you can achieve a polished look without sacrificing skin texture. Remember, the goal is to enhance, not erase. Perfect your advanced skin smoothing techniques in Lightroom by practicing on different skin types, and watch your skills bloom!
Common Mistakes in Skin Smoothing Techniques in Lightroom
1. Overdoing Clarity and Texture Adjustments: Be gentle; you don’t want doll-like skin.
2. Ignoring Global Edits: Always, always start with global adjustments before honing in on skin.
3. Not Checking for Color Consistency: Uneven skin tones can scream ‘edited’!
4. Using Too Much Noise Reduction: It can blur more than just imperfections if you’re not careful.
5. Relying Solely on Presets: Customize for each photo – every face deserves unique attention.
Read Now : Enhancing Photos Using Software
6. Skipping the Healing Brush: This little helper is key for blemishes and spots.
7. Applying Edits Before Cropping: Editing on a photo that’s not yet finalized in composition can be a time-waster.
8. Forgetting to Zoom: Always check how your edits look up close.
9. Avoiding Before/After Comparisons: It’s essential to see how far you’ve come.
10. Neglecting to Save Adjustments as a Preset: Reuse your perfected technique with presets!
Creative Approaches to Skin Smoothing Techniques
Let’s chat about getting a little creative with skin smoothing! Why not experiment a bit? One creative method involves playing around with radial filters. These can simulate more dramatic lighting effects, emphasizing smooth skin. Plus, it can help focus on the face while subtly evening the surrounding areas.
Another trick up your sleeve could be the use of color grading. By tweaking the color wheel, you can create a more cohesive skin tone throughout the image, integrating natural warmth or cool tones as the mood dictates. The best part about skin smoothing techniques in Lightroom is that you can make them uniquely yours. Each photographer has their own style, and this is just a gateway to finding yours. Tailor your techniques until you discover the perfect balance that compliments your artistic vision.
Insider Tips for Skin Smoothing Techniques in Lightroom
Okay, here’s a little secret only seasoned editors know. When it comes to skin smoothing techniques in Lightroom, less is often more. It might be tempting to go all out with the smoothing, but subtlety is key to maintaining a natural, professional look. It helps if you familiarize yourself with how each Lightroom tool impacts different skin types too.
Moreover, it’s worth investing a bit of time in organizing your settings into custom presets once you’ve nailed your perfect combo. This approach saves a ton of time in future edits. Lightly press on those sliders, folks, and remember: the goal is to enhance beauty, not create an entirely different face. Keep practicing, keep learning, and soon you’ll have that magic touch that will set your portraits apart!
Summing Up Skin Smoothing Techniques in Lightroom
In wrapping up, skin smoothing techniques in Lightroom are all about enhancing your subject’s natural beauty while maintaining authenticity. Starting simple is crucial – familiarize yourself with the basic tools like the Adjustment Brush and clarity sliders. As you gain more confidence, you’ll be ready to tackle more advanced techniques, like using Split Toning for a seamless finish.
Remember to avoid common pitfalls such as over-editing and ignoring the overall color tones. Consistency in your approach will pay off in beautifully edited portraits that still look natural. Lightroom’s flexibility allows you to tailor each image uniquely, reflecting your personal style while respecting the subject’s individuality. With practice, the art of skin smoothing will become second nature, adding to the allure and professionalism of your photographic work. Happy editing!