Hey there, fellow photography enthusiasts! So, you’re eager to dive into the world of portrait photography, huh? One of the crucial things that can make or break your shots is understanding ISO. Don’t worry; it’s not as intimidating as it sounds. In this blog, we’ll chat about the ins and outs of finding that sweet spot—proper ISO for portrait photography. Let’s make your portraits pop without the fuss or noise!
Read Now : Advanced Depth Tips For Wildlife Photographers
Understanding ISO in Portrait Photography
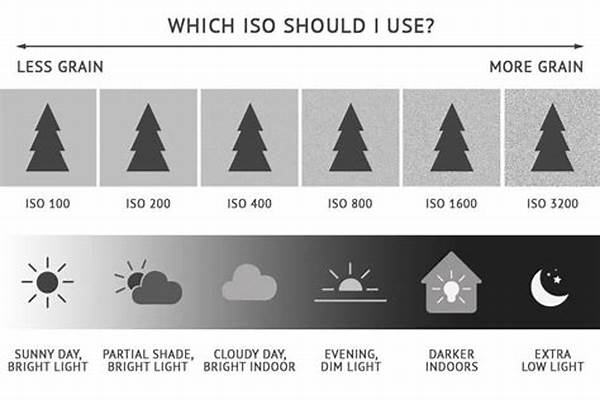
When it comes to portrait photography, achieving the right ISO can sometimes feel like a puzzle. It’s essential to understand how light works with your subject and the surrounding environment. Start by considering the lighting conditions you’re shooting in. If you’re in a brightly lit studio or shooting outdoors in daylight, a lower ISO around 100 to 200 is usually ideal. Lower ISO settings are brilliant at keeping your images crisp and clear, minimizing any noise. However, if you’re shooting in low-light conditions, like during the golden hour or indoors without flash, bumping up your ISO might be necessary. But here’s the trick: just because you can hike up your ISO to 1600 or beyond doesn’t mean you always should. Noise can creep into those precious details of your subject’s face, causing that unwanted grainy look. It’s all about balancing expressive lighting with the proper ISO for portrait photography, ensuring you maintain clarity and avoid unwanted noise.
Another tip? Always combine proper ISO settings with good practices, like steady camera skills and appropriate aperture settings, to let ample light hit that sensor. It’s a dance, and learning the proper rhythm involves some experimentation and practice. Your ultimate goal? Ensure your subject is highlighted perfectly, their features sharp and vibrant, reflecting true skin tones. In the world of portrait photography, mastering ISO settings not only boosts your technical skills but also enhances your creative journey, allowing your images to tell compelling stories that resonate.
Tips for Achieving the Proper ISO
1. Start Low and Slow: Begin with a low ISO setting to keep your portraits sharp. Remember, lower ISO equals less noise. It’s the secret sauce for crisp images!
2. Gauge Your Light: Check the lighting environment. Indoors or low light? Upscale that ISO, but cautiously!
3. Balance with Aperture: Pair your ISO with the right aperture. It’s like peanut butter and jelly—they complement each other beautifully.
4. Test and Adjust: Every scenario is different. Test various ISO levels to find your harmony.
5. Use a Tripod: If boosting ISO increases noise, a tripod can help capture well-lit, stable images without upping that ISO too high.
Common Mistakes When Setting ISO
Avoiding common pitfalls is part of finding that sweet spot for proper ISO for portrait photography. Many beginners set their ISO too high, thinking it’ll solve low-light issues. However, this can lead to grainy images that lose detail. Instead, assess the lighting and stick to a lower ISO when possible, adjusting other settings to compensate. Sometimes photographers rely solely on ISO without considering other crucial elements like shutter speed and aperture. Remember this trio works in harmony! Another common mistake? Forgetting to reset the ISO after shooting in low light. Start every session by checking and adjusting your settings to the current environment. Trust me, that reset can make a world of difference in producing clear photos.
In learning the ropes of proper ISO for portrait photography, patience and practice are your best buddies. As you explore your camera’s capabilities, you’ll start developing a feel for what works in different lighting conditions. Familiarize yourself with how ISO impacts your images so no moment gets lost in grain. Use the variety of settings your camera offers to fine-tune the light balance—an invaluable skill as you grow confident in crafting your portraiture style. And always remember, a nifty post-processing tool can save the day if ISO adjustments don’t go as planned!
Read Now : Quick Pet Photo Capturing
Balancing ISO with Other Settings
Balancing ISO with shutter speed and aperture forms the core of mastering proper ISO for portrait photography. This trio of settings dictates how light interacts with the camera sensor, affecting image exposure and clarity. For bright and vibrant portraits, a balanced ISO setting begins by assessing the ambient light and adjusting ISO to minimize noise while allowing enough light. Think of ISO, aperture, and shutter speed as components of a well-conducted orchestra. Each must harmonize with the others to produce a flattering image outcome.
For instance, in bright lighting, you can go for lower ISO, something around 100 or 200, open up that aperture to blur backgrounds, and match your shutter speed to avoid motion blur. In low-light conditions, you might need to up the ISO but balance can be obtained by using wider apertures and slower shutter speeds, especially if a tripod is handy! Remembering that each image depends on the context and light available is critical. The more versatile you become with these settings, the better you’ll get at intuitively choosing the proper ISO for portrait photography. Your portraits will not only stand out visually but will also narrate vivid stories through perfect light balance—something that every photographer aspires to achieve!
The Impact of Lighting on ISO
Lighting scenarios can dramatically impact your need for adjusting ISO. We’re talking studio setups, natural lighting, golden hour magic, or even moody low-lit environments! Each scenario calls for different ISO tweaks. When basking in bright light, low ISO settings keep noise at bay, allowing skin textures to shine. The golden hour is every portrait shooter’s fantasy—the soft, diffused light is ideal for lowering ISO while highlighting natural beauty. Indoor or artificially lit settings might compel you to bump up that ISO to capture every detail. Embrace the noise cautiously in dim conditions; if necessary, as higher ISO might lead to loss of finer details.
The ability to read light and adjust the proper ISO for portrait photography can be your game-changer. It’s all about balancing desired artistic effects with technical accuracy! Hone these skills, use light to accentuate your subjects, and remember—the right ISO ensures nothing detracts from their natural allure, whether they’re basking in soft sunlight or highlighted in shadowy intrigue.
Wrapping It Up on ISO
In conclusion, mastering the proper ISO for portrait photography is about striking the right balance among your camera’s settings to capture stunning, noise-free images. As you get familiar with how ISO interacts with various light conditions, you’ll start seeing improvements in your work. Remember, adjusting your ISO is just one part of the equation. It’s equally important to complement it with the right aperture and shutter speed. Continual learning and experimenting with different settings in diverse lighting conditions will further refine your skills and lead you to discover your unique style. With time, what once seemed overwhelming will become second nature, letting you focus more on creativity and less on technicalities.
Keep this knowledge in your photographer’s toolkit, and be fearless in exploring different environments. Whether you’re shooting portraits outdoors, in a studio, or capturing candid moments, being mindful of the proper ISO for portrait photography helps elevate your work. The more comfortable you grow with your camera, the more you’ll appreciate the magic that happens when technical precision meets artistic flair. Remember, every professional started where you are, so embrace the journey, keep snapping, and watch your portraits come to life.