Hey there, fellow shutterbugs! Today we’re diving deep into the world of portrait photography with a focus on those elusive ISO tips. I know, I know — ISO can feel like a complicated beast sometimes, especially when you’re aiming for that perfect shot. But fear not, because by the end of this article, you’ll be armed with enough knowledge to make your portrait shots look more professional. Let’s get started, shall we?
Read Now : Photographing Feline Movement Tips
Understanding ISO in Portrait Photography
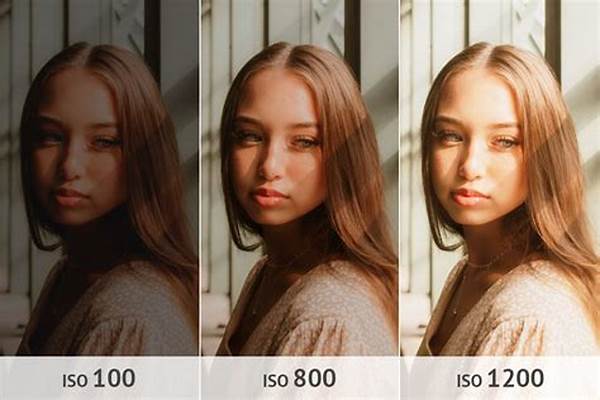
Have you ever wondered why some portrait photos look incredibly sharp and well-lit, while others seem grainy or too dark? It all comes down to understanding how to use ISO effectively in your portrait photography. ISO determines the sensitivity of your camera’s sensor to light. The lower the ISO, the less sensitive it is to light, which usually results in a cleaner image. However, in low-light conditions, a higher ISO might be necessary, although it can introduce noise. The key to applying portrait photography ISO tips is balancing the ISO settings with your lighting setup, maintaining an ideal exposure without sacrificing image quality. So next time you’re taking portraits, play with the ISO settings while considering the natural or artificial light around you. Trust me, a little experimentation can go a long way in enhancing your portraits.
Quick ISO Tips for Better Portraits
1. Start Low: Begin with the lowest ISO setting for cleaner images.
2. Steady Lighting: Adapt ISO to the existing light conditions for balance.
3. Use a Tripod: If using low ISO in dim conditions, a tripod can avoid blur.
4. Test Shots: Take a few test images to see how different ISO settings perform.
5. Edit Wisely: Post-processing can help reduce noise from high ISO settings.
Common Mistakes with ISO in Portrait Photography
When it comes to portrait photography iso tips, there are some common pitfalls shooters often find themselves in. One biggie is cranking up the ISO in poor lighting without trying alternative solutions first. A high ISO can save a photo from darkness, but it’ll also bring in that noisy grain you probably want to avoid in a flattering portrait.
Another mistake we see often is not investing the time to understand how ISO affects image quality under varying lighting conditions. Yes, learning takes time and attention, but it makes all the difference, especially when you’re documenting special moments where there’s no chance for a reshoot. Spend time exploring different ISO settings in various scenarios and learn to predict outcomes. This foresight is invaluable and one of the crucial portrait photography iso tips you should definitely master.
Maximizing ISO Settings for Portrait Photography
If you’re keen on mastering the art of using ISO efficiently, consider these ten explanations as pillars in your learning journey. Remember, portrait photography iso tips are more about adapting to your environment rather than sticking to rigid settings.
1. Know Your Gear: Different cameras handle ISO differently; know yours well.
2. Practice Under Varied Lighting: Experiment with attaining optimal ISO.
3. Evaluate Light Source: Natural light vs. artificial makes a big difference.
4. Stay Steady: Lower ISO benefits greatly from a stable platform/tripod.
5. Pay Attention to Detail: Every ISO change affects picture detail.
6. ISO and Shutter Speed Relationship: Balance these to avoid motion blur.
Read Now : Introduction To 3d Photography Techniques
7. RAW Format: Shooting in RAW provides more latitude to adjust ISO impact.
8. Noise Reduction Tools: Learn them in post-processing to fix high ISO noise.
9. Mindful of Depth of Field: FN plays a part alongside ISO.
10. Look for Patterns: Document which ISO settings produce best results for conditions you shoot in often.
Pro Tips for Portrait Photography ISO
Alright, it’s time to get cozy with some more advanced portrait photography iso tips to level up your game. As you get more comfortable with ISO adjustments, don’t shy away from moving past auto settings. That’s right—manual mode is your friend. Sometimes the auto settings won’t do justice to the artful composition you’re trying to achieve.
Many photographers find it beneficial to start with a low ISO and gradually increase until they get just the right touch of balance in terms of noise and quality. While keeping noise reduction tools handy in post-processing is important, relying solely on them can sometimes distort your original vision for the portrait.
Lastly, when shooting portraits outdoors, consider the sky conditions as well. A bright, sunny day will call for a much different ISO setting than an overcast afternoon. One of the most practical portrait photography iso tips is to get familiar with how weather conditions dictate your ISO needs. So grab your camera, get outside, and start practicing!
Slang-y Tips for Portrait Photography ISO
Yo, if you wanna snap killer portraits, you gotta get tight with ISO, y’know? It’s like the secret sauce of crisp, fresh shots. Imagine being the DJ at a party vibing the volume — that’s basically you with ISO on your cam. Getting real with portrait photography iso tips is the bomb!
Think of ISO as that friend who you wanna hang with just the right amount — too little, and your pics are dark side; too much, and it’s like everyone’s shouting in the pic (read: noisy AF). For outdoor shots or well-lit spaces, treat ISO like it’s on chill mode. Low is the way to go. But when you’re down at that dim lit venue trying to catch that moody portrait vibe? You might need to crank it a bit up. Just remember to keep that noise in check because we’re about classy shots, not joined-the-dots puzzles!
Summing It Up: Portrait Photography ISO
So to wrap things up in this ultimate guide to portrait photography iso tips, remember that ISO is one of those key factors along with aperture and shutter speed that you need to get cozy with. It dictates how much light enters your camera’s sensor and directly affects how your photos turn out.
When you’re out there shooting, plan ahead. What kind of lighting conditions will you be working with? Natural light, studio lights, golden hour glow — each situation demands a different ISO setting. Keep experimenting with different ISO values in various environments and watch your portrait skills grow exponentially.
Don’t be afraid to make mistakes; every oops moment is just another step towards mastering your camera. Before long, you’ll find yourself confidently sharing your personalized portrait photography iso tips with fellow budding photographers. Have fun shooting and let your creativity shine through every click!


