Hey there, fellow photography enthusiasts! Ever found yourself fiddling with your camera settings, wondering how to get the perfect shot? Well, you’re in luck because today we’re diving into the wonderful world of portrait photography ISO settings. Buckle up, because by the end of this guide, you’ll be snapping photos like a pro.
Read Now : Capturing Visual Balance In Photos
Understanding ISO in Portrait Photography
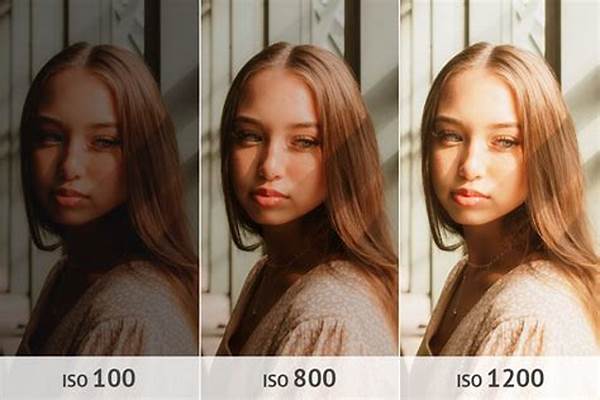
ISO settings can seem a bit daunting at first glance. But fear not, because understanding ISO is simpler than you think. Essentially, ISO measures your camera sensor’s sensitivity to light. The lower the ISO number, the less sensitive it is, which is perfect for bright conditions and less noise. On the other hand, a higher ISO setting increases sensitivity, perfect for low-light environments but be wary of the noise that can come with it.
When it comes to portrait photography, your goal is often to capture crisp, clear images of your subject. A low ISO setting, say ISO 100, is great if you’re shooting in a well-lit room or outdoors on a sunny day. You’ll get sharp images without the grainy noise interfering. However, if you’re working in dim light without additional lighting equipment, bumping up your ISO to 800 or even 1600 can help you maintain a fast enough shutter speed to avoid motion blur while still ensuring your subject is nicely exposed.
Understanding this balance is key to mastering the portrait photography ISO settings guide. Remember, balancing ISO with shutter speed and aperture is crucial to finding the perfect exposure – the Holy Trinity of photography!
Tips for Setting ISO in Portrait Photography
1. Shooting in daylight? Stick to a low ISO setting, like 100 or 200. This keeps your images sharp and vibrant.
2. Indoor portraits? Start with ISO 400 and adjust as needed, depending on your lighting setup.
3. Shooting in low-light scenarios? Don’t be afraid to push to ISO 800-1600 to avoid motion blur.
4. Got some professional lighting? Lower that ISO. It reduces noise and maximizes quality.
5. Experiment, review, and tweak. Each setting can change depending on your specific conditions—so embrace trial and error.
The Impact of ISO on Portrait Quality
Alright, let’s talk about how ISO can influence the look and feel of your portraits. The portrait photography ISO settings guide is essential for attaining the right exposure and mood. High ISO values can introduce noise, which might add unwanted texture to your subject’s skin. This graininess can sometimes be artistically useful, but more often, we want smooth, creamy skin tones.
Read Now : Methods To Highlight Subject Details
A lower ISO means you’ll capture those dreamy, soft images without noticeable noise. But remember, while low ISO keeps your portraits crystal clear, it requires more light. This is why those golden hour shots or a nicely lit studio can make all the difference. Higher ISO settings, while useful for retaining sharpness in darker environments, can muddle details if not managed well. Hence, the art of balance is your best friend!
Quick Guide: Navigating ISO for Portraits
Crafting Perfect Portraits: Practical ISO Tips
ISO settings are like spice—add just the right amount, and your dish is perfect. Misjudge it, and well…you know. As seen in this portrait photography ISO settings guide, finding balance is everything. Start with a low ISO setting where possible and increase as needed if the conditions dictate.
One critical yet frequently overlooked piece of advice is to know your camera model. Each camera has a sweet spot—an ISO setting that gives you the best quality with minimal noise. Checking this out beforehand will save you loads of time during shoots. Play around with various settings, take test shots, and remember that this journey is about experimenting. Photography should be fun, so embrace the process and capture those candid, memorable moments!
Keep It Natural: ISO and Authentic Portraits
Alright, let’s get real. We all want those Instagram-worthy portraits, right? The key is capturing authenticity, which often comes from experimenting a little during your session. So, take heed of this portrait photography ISO settings guide and remember that ISO shouldn’t dictate your style—it’s just there to support your vision.
When you dial down your ISO for those soft, natural shots, you allow the natural lighting to shape the narrative of your image. This often results in capturing the genuine expressions and subtleties that tell a story, much like a candid snapshot from a vintage film reel. And let’s not forget, if higher ISO is required, don’t stress. Embrace it if it adds to the atmosphere—sometimes the graininess enhances the story.
Wrapping It All Up: Mastering ISO in Portraits
So, here we are, concluding our deep dive into the portrait photography ISO settings guide. It’s been quite the ride from understanding ISO basics to fine-tuning settings to craft the perfect portrait. The key takeaway is that ISO is a balancing act. When used effectively, it brings out the best in your photography.
Relax, experiment, and adjust as needed. There’s no one-size-fits-all formula, so pay attention to your environment and make ISO adjustments based on personal style and conditions. Until next time, keep shooting, and may all your portraits be lit—literally and figuratively!