Hey there, fellow photography enthusiasts! If you’re like me, always chasing that perfect outdoor portrait shot, you’ll know that mastering ISO is a game-changer. ISO optimization can make the difference between a good photo and a stunning one, especially when you’re shooting outdoors. Stick around as we delve into some cool tips and tricks to ace those outdoor portrait shots with the right ISO settings.
Read Now : Image Rights Management Tools
Understanding the Basics of ISO in Outdoor Portraits
When shooting outdoor portraits, the lighting can be unpredictable. Whether it’s a cloudy day or you’re capturing the golden hour, understanding your ISO settings is crucial. ISO determines your camera’s sensitivity to light, and getting it right can elevate your photos to another level. Outdoor portrait ISO optimization techniques involve finding the perfect balance where the ISO is high enough to capture details but low enough to avoid noise.
Imagine you’re at a park, and the day is partly cloudy. Adjusting your ISO can help maintain the natural vibrance of the scene without overexposing your subject. An ISO of around 100-400 can be a sweet spot, giving you crisp details while keeping noise at bay. But remember, it’s all about experimenting with your settings based on environmental conditions to achieve that stunning shot.
While it might seem intimidating at first, playing around with ISO settings can be super rewarding. You might find that under different lighting conditions, your subject’s skin tones appear more natural and the background beautifully blurred. Outdoor portrait ISO optimization techniques don’t just stop at adjusting numbers; it’s about understanding how light interacts with your subject and using that to your advantage.
Top Tips for Outdoor Portrait ISO Optimization
1. Know Your Environment: Always assess the lighting conditions before setting your ISO. Outdoor portrait ISO optimization techniques start with understanding the environment you’re shooting in.
2. Experiment with Settings: Don’t be afraid to play around with your camera’s ISO settings. Trust me, outdoor portrait ISO optimization techniques can be your creative playground.
3. Keep Noise Levels in Check: Higher ISO can introduce noise, which isn’t always pretty. Learn when to dial it back; that’s a key part of outdoor portrait ISO optimization techniques.
4. Utilize Natural Light: Leverage the natural light available. It’s one of the simplest outdoor portrait ISO optimization techniques that can transform your images.
5. Post Processing is Your Friend: Sometimes optimizing ISO might not be enough. Enhance your outdoor portrait ISO optimization techniques with some post-editing love.
Advanced Tricks for Mastering Outdoor ISO
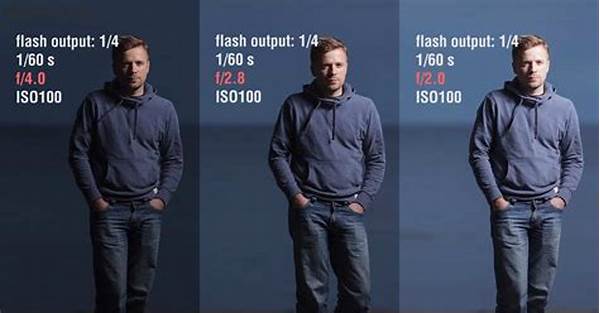
Outdoor portrait ISO optimization techniques can dramatically improve your photography. It largely revolves around how well you can manipulate ambient light. Use reflectors or diffusers during harsh noon sunlight to balance shadows and highlights. Combine a lower ISO with a wider aperture, like f/2.8, to create an aesthetic depth of field, emphasizing your subject against a beautifully blurred background.
Knowing when to increase your ISO gives flexibility when shooting fleeting moments. Evening shots, for example, demand a higher ISO to capture that soft, natural light without a tripod. These outdoor portrait ISO optimization techniques ensure that the quality of your photos remains intact. Sometimes, it’s worthwhile to sacrifice a bit of noise for capturing a transient smile or an endearing glance.
Remember, the goal of outdoor portrait ISO optimization techniques is to convey emotion and atmosphere. As you refine your understanding of ISO, you’ll see substantial improvements in your outdoor portraits. From capturing candid moments during golden hour to spontaneous street photography, mastering ISO intricately ties your creative vision to technical expertise.
Common Mistakes and Their Solutions for ISO
It’s easy to fall into traps when starting with outdoor portrait ISO optimization techniques. One common mistake is sticking to a default ISO setting, which might not suit all lighting conditions. Always assess and adjust as needed to avoid overexposed or underexposed images. Another pitfall is ignoring the ISO-auto setting. While convenient, it might not always yield optimal results for every shot.
Be wary of relying solely on high ISO for night shots as it can amplify noise dramatically. Instead, consider using a combination of a tripod and a slower shutter speed to maintain image quality. Also, avoid jumping to the maximum ISO setting your camera allows, as some mid-range settings can provide better image quality with less noise. These outdoor portrait ISO optimization techniques address common issues to enhance your photography experience.
Read Now : Tips For Virtual Photography Exhibitions
Sometimes beginners focus solely on ISO, neglecting other technical aspects like aperture and shutter speed. Remember, outdoor portrait ISO optimization techniques are part of a broader skill set. Learn to balance ISO with other camera settings to master your craft. Practice regularly in different environments to gain confidence and adapt to various lighting conditions.
Exploring Tools and Gear for Better ISO Control
Thinking about upgrading your gear for better ISO control? Let’s dive into the world of camera equipment. When applying outdoor portrait ISO optimization techniques, having the right equipment can make a huge difference. Cameras with larger sensors often handle noise better at higher ISOs. If you’re into post-processing, DSLR and mirrorless cameras offer RAW file options, giving you further control in editing environments.
Don’t forget about lenses! Prime lenses with wider apertures let in more light, reducing the need for high ISO settings. They’re a must-have tool for those who are keen on mastering outdoor portrait ISO optimization techniques. A tripod is another handy tool; it aids stability during low-light conditions, allowing a slower shutter speed without upping ISO levels too drastically.
When shooting portraits, reflectors or diffusers can considerably improve lighting, giving you more ISO flexibility. Proper lens filters can also help manage brightness, making these outdoor portrait ISO optimization techniques even more efficient. With thoughtful equipment upgrades, your journey into ISO optimization becomes significantly more rewarding and fun!
Why ISO Matters More Than You Think
Alright, let’s get real here. If you’re scrolling through tons of photography tips, you’re probably bombarded with the mantra: “ISO, shutter speed, aperture.” But why does ISO get its own spotlight, especially when we’re out capturing the magic of outdoor portraits? Well, buckle up, image-seeker, because outdoor portrait ISO optimization techniques are your ticket to pro-level shots.
ISO is that unsung hero, balancing light intake without having to adjust other camera settings wildly. The beauty of nailing outdoor portrait ISO optimization techniques lies in maximizing your camera’s potential by lighting its path correctly, shooting from 100 to 6400 with finesse. Sounds techy, right? But trust me, getting comfy with ISO makes creativity your new BFF.
You see, ISO isn’t just a number to tweak; it’s a way to allow the essence of natural light to kiss every detail of your subject while keeping grainy, noise-filled shots at bay. It’s about optimizing those soft, dreamy backgrounds and crisp facial expressions even when lighting’s less than ideal. So next time you’re out there, remember: master your ISO, and outdoor portrait awesomeness awaits!
Final Thoughts on ISO Optimization
Outdoor portrait ISO optimization techniques should feel like second nature as you continue honing your craft. Start with a clear plan based on your environment—know when to crank up your ISO and when to keep it low. Embrace the conditions; yes, that includes taking full advantage of both cloudy days and the beautiful golden hour.
For anyone eager to see notable improvements in their outdoor portraits, these tips are your go-to toolkit. Practice regularly, and don’t shy from experimenting. Dive into your camera settings and make ISO adjustments a routine part of your shooting process. This intentional practice turns outdoor portrait ISO optimization techniques from a chore into an art form.
Ultimately, your photographs are a testament to understanding and capturing light. Embrace, adapt, and refine your ISO mastery to highlight the essence of your subjects. With these techniques at your fingertips, you’ll soon be on your way to creating visually stunning, emotion-filled images that capture the purity and allure of outdoor photography.