Hey there, photography enthusiasts! If you’re anything like me, capturing the perfect shot under natural light can feel like chasing a sunset—elusive, yet oh-so-worth-it. Today, we’re diving into the heart of the matter: optimizing ISO for natural lighting. Whether you’re a newbie or a seasoned shutterbug, understanding and mastering ISO can take your photography game to the next level. So, grab your camera, and let’s explore the art of making the most out of those beautiful, sunlit moments!
Read Now : Essential Elements Of Visual Brevity
Understanding ISO in Natural Lighting
Have you ever wondered why some of your photos look grainy while others are crisp and clear? The secret often lies in optimizing ISO for natural lighting. ISO, the measure of your camera sensor’s sensitivity to light, can make or break your photos. In natural light situations, the trick is to find the sweet spot where your images come out looking vibrant without the uninvited guest of noise.
Imagine you’re capturing a stunning sunrise. The light changes rapidly, and you need to adjust your ISO settings to complement the natural ambiance. A lower ISO keeps your image clean, while a slightly higher ISO can brighten up shadows during golden hours. Experimenting with different ISO settings lets you see which works best under varying conditions, empowering you to immortalize those unique moments beautifully.
In natural sunlight, remember that increasing the ISO is like turning up the volume on a radio—useful when needed but can introduce distortion if overdone. Keep your ISO as low as possible, adjusting gradually to illuminate shadowy corners or emphasize subject details. With practice, optimizing ISO for natural lighting becomes second nature, enabling you to shoot with confidence and creativity.
Quick Tips for ISO Optimization
1. Golden Hour Magic: Optimize ISO for soft, flattering light by using a low ISO around sunrise or sunset.
2. Cloudy Day Perks: On overcast days, bump up ISO slightly to compensate for reduced light while maintaining clarity.
3. Action Shots: For capturing movement, a higher ISO lets you freeze motion, especially in dim natural light.
4. Interiors with Natural Light: Open your windows and keep the ISO moderate to capture a warm, inviting atmosphere.
5. Nature Walks: Use ISO creatively to highlight contrasting landscapes, ensuring details stand out.
Advanced Techniques for ISO Mastery
Ready to become an ISO ninja? Let’s take it up a notch. Optimizing ISO for natural lighting doesn’t mean one-size-fits-all. It’s about finding that balance between sensitivity and noise that works for your style. By getting a solid grip on ISO settings, you’re not just taking photos; you’re telling stories through light.
Start by shooting in manual mode. It might seem daunting, but it gives you control over ISO, shutter speed, and aperture simultaneously. Practice makes perfect, and as you grow more confident, you’ll instinctively know when to tweak ISO for the best results.
A nifty trick is to use auto ISO sparingly. While it can be a lifesaver, manual adjustments allow for greater creativity. Knowing when and how to override auto settings ensures you capture the true essence of your scene, free from unwanted noise or unexpected exposures.
The Art and Science of ISO Adjustments
Optimizing ISO for natural lighting is an art in itself. Here are ten pointers to keep in mind:
1. Device Knowledge: Know your camera’s ISO range for optimal usage.
2. Balance is Key: Juggle ISO with shutter speed and aperture for perfect exposure.
3. Consider Your Subject: Different scenes may need different ISO settings.
4. Watch the Noise: High ISO can introduce noise, so test tolerances.
Read Now : Easy Watermark Application For Pictures
5. Light Variations: ISO helps adapt to light changes without lens swapping.
6. Utilize Bracketing: Experiment with different exposures to find the best ISO fit.
7. Check in Bright Sunlight: Even with plenty of light, ISO adjustments can heighten detail.
8. Understand Trade-offs: Increased sensitivity might reduce image sharpness.
9. ISO’s Role in Post: Lower ISO gives you more leeway in editing.
10. Be Patient: Mastering ISO takes time, so enjoy the learning curve!
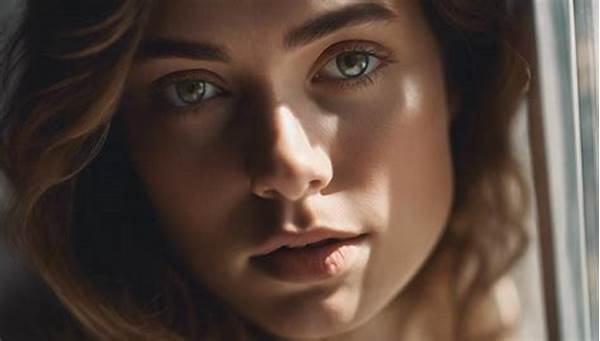
Experimenting with ISO for Natural Light Portraits
Let’s talk about portraits, shall we? When optimizing ISO for natural lighting, especially in portrait photography, it’s all about mood and emotion. Natural light portraits aren’t just about capturing faces; they’re about embedding stories into photographs. Whether you’re shooting outdoors or next to a window, the right ISO can make your subject glow with life.
In portraits, higher ISO settings work when natural light is limited, perhaps during the magic hours close to dawn or dusk. This is when understanding ISO becomes critical to maintain the softness and warmth of the skin tones. Lower ISO levels help in bright, midday conditions to keep skin tones smooth and highlights controlled.
Also, keep an eye on the background—sometimes a slightly higher ISO can subtly brighten a shaded background, adding depth and interest. Experiment and find what complements your subject’s features, making sure the balance of light and shadow enhances their best attributes. With practice, optimizing ISO for natural lighting in portraits becomes second nature, translating emotion and ambiance into every frame.
Slang-tastic Guide to ISO
Yo, picture-takers! Let’s spill the tea on optimizing ISO for natural lighting. You wanna ace those sunlit selfies and landscape shots, right? Well, the secret sauce is juggling that ISO like a pro. So, when it’s hella sunny, keep it low. When it’s shady, you might wanna push it up a notch—keep it crispy, fam!
Wanna keep those pics noise-free? Play with that ISO setting till you hit the sweet spot. No more grainy mess, just high-def dreams. Trust, once you get the hang of tweaking it, your shots will be total fire. Dive into manual mode; don’t be scared, just do you. You got this!
Summing Up ISO Optimization
As we wrap up on optimizing ISO for natural lighting, remember that photography is a delightful blend of science and creativity. The ISO settings play an integral role in how your final images turn out. Whether it’s capturing a golden landscape or the contours of a loved one’s face, adjusting the ISO allows your unique vision to shine through.
Dedicate time to practice and make mistakes, as they are vital aspects of mastering photography. Each outing with your camera is an adventure in experimenting with light and shadow. As you practice optimizing ISO for natural lighting, these experiences build your confidence and skill, equipping you to capture gorgeous, light-filled photos.
Ultimately, the art of photography lies in capturing the essence of a moment, and with the right ISO settings, those moments are more than just records; they become vivid stories told through your images. Keep exploring, stay curious, and most importantly, have fun with your camera. Happy shooting!