Hey there, fellow visual enthusiasts! If you’re anything like me, you’re all about getting that perfect picture quality. Whether you’re trying to up your movie night game, impress your friends during a gaming tournament, or simply enjoy your favorite shows with razor-sharp clarity, the quest for the optimal picture clarity settings is real. As technology strides forward, our screens are capable of delivering some jaw-dropping visuals. But, unlocking their full potential means diving into the settings. Let’s explore how to achieve those pristine visuals you’ve been dreaming of.
Read Now : Dreamlike Visual Narrative Techniques
Understanding Optimal Picture Clarity
Achieving the optimal picture clarity settings often feels like a mix of art and science. Most modern TVs and monitors come with a plethora of picture settings tailored for different viewing experiences. Think of sports mode, cinema mode, and game mode as just some of the options at your fingertips. Tinkering with these presets while adjusting contrast, brightness, and sharpness could lead you to the sweet spot for your viewing pleasure. But remember, it’s all about personal preference at the end of the day—what looks stunning to one person may not appeal to another. So, don’t shy away from testing different settings until you find your match.
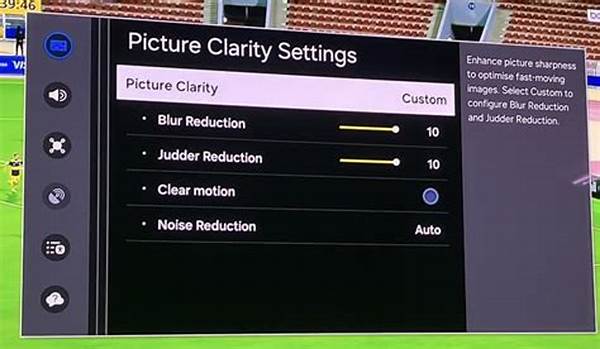
Apart from the standard settings, many displays also offer advanced options like motion smoothing and color temperature adjustments. Motion smoothing is great for watching sports or action-packed movies, as it reduces motion blur, while tweaking the color temperature can either warm or cool your display’s color tones. Knowing which combination suits your eyes best can lead to achieving those optimal picture clarity settings you’ve been chasing. Start with factory presets and make incremental changes—your perfect setup is just a few tweaks away.
Additionally, ambient lighting plays an understated yet vital role in achieving optimal picture clarity settings. A screen that looks perfect in a dimmed room might not perform the same in a brightly lit environment. Many opt for bias lighting behind the screen, which reduces eye strain and enhances perceived contrast. The aim is to align the settings to suit your space, ensuring your viewing experience isn’t hindered by external light sources. It’s an approach that combines technology and environmental tailoring to truly perfect your picture clarity.
Quick Tips for Optimal Picture Clarity
1. Natural Lighting Adjustments – Always consider the ambient light in your room. Adjust your brightness settings for the time of day to maintain those optimal picture clarity settings.
2. Factory Reset First – Start with the factory settings before diving deep. It’s the baseline for reaching those optimal picture clarity settings.
3. Contrast is Key – Proper contrast adjustments can make or break your visuals. Crank it up just enough to enhance texture without losing details for optimal picture clarity settings.
4. Warm vs. Cool – Explore different color temperature settings to fit your mood. Whether warm or cool, it’s all about finding the optimal picture clarity settings for your preference.
5. Test Different Modes – Use modes like game or cinema as a starting point before fine-tuning for your optimal picture clarity settings.
The Science of Picture Settings
Our eyes perceive colors and details differently based on multiple factors like distance, lighting, and even mood. This is why what works as optimal picture clarity settings for you might not be ideal for me. Often, the default settings are calibrated for showrooms or lab environments—not the cozy corner of your living room. This means fine-tuning is necessary for optimal viewing. Remember, the quest for the perfect settings is all about crafting something that works for you.
Picture modes can seem intimidating with all the technical terms and sliders. But once you get the hang of it, those optimal picture clarity settings you’re after are within reach. Don’t be afraid to consult the user manual or tutorials online; they’re treasure troves of information. When in doubt, a quick reboot (yes, like a computer) can restore default settings and give you a clean slate to start new experiments. It’s about balance, patience, and a bit of curiosity to hit the visual jackpot.
Every brand may have its proprietary features, like “True Color” or “Dynamic Contrast,” that aim to enhance your viewing experience. Delving into these features could reveal new dimensions of what your screen can do. Understanding your hardware’s capacity and the scientific knobs you can twist brings you closer to those coveted optimal picture clarity settings. That being said, remember perfect clarity often stems from subjective enjoyment, not just technical prowess.
Achieving the Ultimate Viewing Experience
Here are ten friendly pointers to guide you toward those optimal picture clarity settings:
1. Know Your Device – Familiarize with your screen’s specs and features.
2. Room Setup – Arrange your room to minimize glare and enhance contrast.
3. Calibration Tools – Use calibration DVDs or apps for fine-tuning.
Read Now : Tools For Quick Background Adjustments
4. Dynamic Range – Play with HDR settings if available.
5. Test Content – Use familiar content to benchmark settings.
6. Refresh Rate – Adjust to minimize screen tearing in fast actions.
7. Firmware Updates – Regularly update your device for optimal functioning.
8. Smart Features – Enable auto-adjust settings for dynamic optimization.
9. Expert Reviews – Check what settings professionals recommend.
10. Personalize – Customize settings for each device input or source.
Getting to Know Picture Settings
Now that you’ve got the basics, let’s dive a little deeper! Fine-tuning your optimal picture clarity settings involves understanding your screen’s unique features. First up, contrast controls. This setting enhances details in the shadows and highlights, bringing depth to your images. While you don’t want it too high—leading to washed-out colors—testing around the default setting is usually a safe bet.
Up next, sharpness. It’s tempting to think higher sharpness means better clarity, but too much can create artificial halos around objects. The goal is to find a balance where the details pop but still look natural. Now, onto those more advanced settings like noise reduction. This feature can smooth out grainy images but use it sparingly to maintain crisp visuals. Each adjustment brings you one step closer to your picture-perfect setup.
Additional Insight on Picture Settings
Alright, folks, let’s wrap this up with some fun insight. You ever feel like your screen’s brightness is roasting you alive during a cozy binge-session? That might be because it’s set for store “blazing sun mode.” Tone it down a notch for some optimal picture clarity settings. Trust me, your eyes will thank you! And what about those times when your screen seems out of sync? Calibrating for frame rate and refresh alignments can bring everything back into buttery-smooth harmony.
Essentially, find a buddy or two who’ve cracked the code with their display. Learn, swap tales, and, most importantly, don’t be afraid to reset and start over. Every experiment is one step closer to those magical optimal picture clarity settings. Cheers to endless movie nights and hours of vibrant gaming!
Putting It All Together
Wrapping up, achieving the optimal picture clarity settings is more than a quest—it’s an art of personalizing technology to fit your preferences perfectly. With a bit of tweaking, your screen’s performance can elevate from good to spectacular. Remember, every room and eye perceives light and color uniquely, so don’t be too bound by preset modes alone. Dive deep into advanced settings if you’re feeling adventurous and find what works best.
Now that you’re equipped with the tools and tips for optimal picture clarity settings, your favorite shows, games, and movies can look better than ever. The journey to perfecting your screen may take a few trials, but the result guarantees an enthralling visual experience every time you press play. Whether you’re snuggled up at home or hosting a viewing party, your newfound clarity settings will truly stand apart. Here’s to crystal-clear viewing and endless hours of entertainment!