Hey there, photography enthusiasts! If you’re into portraits, you know how important capturing the essence of your subject is. But what about the technical stuff, like ISO settings? Yep, that’s right—nailing the optimal ISO range for portrait images can make all the difference. Sit tight and dive into this with me!
Read Now : Enhance Linkedin Photos Using Lighting
Understanding the Basics of ISO for Portraits
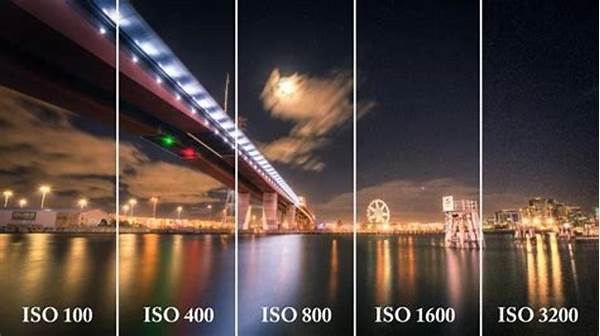
Before we jump into specifics, let’s talk a bit about ISO. In simple terms, ISO determines your camera’s sensitivity to light. Finding the optimal ISO range for portrait images involves balancing sensitivity so you get the right exposure without compromising quality. Too high, and your image gets noisy. Too low, and you risk underexposure. But fear not! There’s a sweet spot, and that’s what we’re here to explore. The goal is top-notch clarity and warmth in skin tones, ensuring you capture those beautiful details.
Most cameras offer a range, like ISO 100 to 3200 or more on some advanced gear. For portraits, an ISO between 100 to 400 is often ideal for brightly lit conditions or studio environments. This range maintains the clarity of facial features and minimizes noise. However, if you’re shooting in lower light, like during golden hour, you might stretch it to 800. The trick is to test your camera in different lighting to lock down that sweet spot for the optimal ISO range for portrait images.
Tips for the Perfect ISO Setting
1. Consider your light source. Natural light, like windows or outdoor settings, can reduce the need for high ISO adjustments.
2. Use a tripod. It can help lower ISO settings by allowing a slower shutter speed without blur.
3. Experiment with settings. Familiarize yourself with your camera’s capabilities to find the optimal ISO range for portrait images.
4. Use manual mode. This provides more control over ISO, aperture and shutter speed.
5. Shoot in RAW. Gives flexibility to adjust the ISO in post-processing without losing quality.
Adjusting ISO for Various Lighting Conditions
In practice, pinpointing the optimal ISO range for portrait images is both an art and a science. Imagine you’re outdoors on a sunny afternoon. A lower ISO, like 100 or 200, lets you capture that natural beauty without artificial glare. As the sun sets, bumping it up to around 400-800 maintains those warm tones while adding some ambient light magic.
Now, indoor settings can sway between natural window light or artificial bulbs. For natural light near windows, stick with a 100-400 range—you’ll love the soft, natural look. Meanwhile, if you’re dealing with dim indoor bulbs, pushing higher towards 800 or even 1600 might be necessary, ensuring your portraits remain vibrant and detailed. Playing around with these settings and knowing when to raise or lower them is crucial to perfecting your portraits.
Top Pointers to Nail ISO for Portraits
1. Document Each Setting: Write down what works in specific lighting; this becomes your personalized guide to the optimal ISO range for portrait images.
2. Explore Camera Apps: Mobile photographers might find app settings with better ISO control, offering new creative paths.
Read Now : Free Tools For Image Watermarking
3. Embrace HDR: If you’re into creativity, HDR shooting can complement the optimal ISO range for portrait images, enhancing dynamic range.
4. Bracketing Technique: It’s an ace tool for testing different ISO ranges in rapid succession.
5. Practice Low Light Portraits: Every photographer enjoys a challenge, and low-light conditions can teach you much about ISO.
Mastering the Camera’s Sweet Spot
When you achieve the optimal ISO range for portrait images, your portraits pop like never before. The key is in understanding that ISO settings can dramatically influence mood and clarity. Let’s say you’re capturing portraits at a wedding. If it’s outdoors in the midday sun, lower ISOs give you crisp, clear results. Move indoors to a romantically lit hall, and pushing ISO up helps preserve the ambiance without sacrificing detail.
Transitioning between these settings with ease and confidence is what separates a casual photographer from an expert. Pro tip: Make it a point to review your test shots on a computer. The larger view often highlights noise you might miss on your camera’s LCD screen. Trust me, achieving the optimal ISO range for portrait images will soon become instinctive, enhancing your craft and ensuring memorable captures!
Boosting Portrait Quality with Ideal ISO
Let’s get real, guys. Diving into that optimal ISO range for portrait images is like unlocking a hidden level in a game. It’s just that cool. Imagine crisp captures that highlight every little glint of the eye or curl of a smile—yup, all through mastering ISO. Now, I’m not saying it’s the only thing that matters but, in the grand scheme, a spot-on ISO is golden.
What we sometimes overlook is how fiddling with just a teeny bit of ISO can save an entire shoot. Picture those setting changes as micro-adjustments that pivot between mediocre and magical. With the right tweaking, your subject’s natural vibe is captured perfectly, and every photo session turns into a snapshot of brilliance.
Wrapping It Up with ISO Magic
In the bustling world of photography, finding the optimal ISO range for portrait images can radically up your game. It’s about exploring and finding that sweet spot where light, sensitivity, and subject alignment create that ‘wow’ factor. As you grow more confident, setting your ISO becomes second nature, blending technique with artistic intuition seamlessly.
Ultimately, the magic happens when you push beyond comfort zones—trial, error, and experience showing you how to use ISO creatively. It ties everything together, from elevating a humble photo session around a cozy dinner table to grand events where capturing detail becomes crucial. So grab your camera, venture into different lights, and practice those ISO settings. That’s where you’ll find not just the optimal ISO range for portrait images, but a powerful avenue to express and share your photographic vision. Happy shooting!


