Hey there, photography enthusiasts! If you’re all about snapping those perfect shots but find yourself struggling with those not-so-perfect blemishes, you’re in for a treat. Today, we’re diving into the world of image retouching effects comparison – a fun and essential part of editing that can turn your photos from drab to fab in no time.
Read Now : Art Perception Across Cultures
Understanding the Basics of Image Retouching Effects Comparison
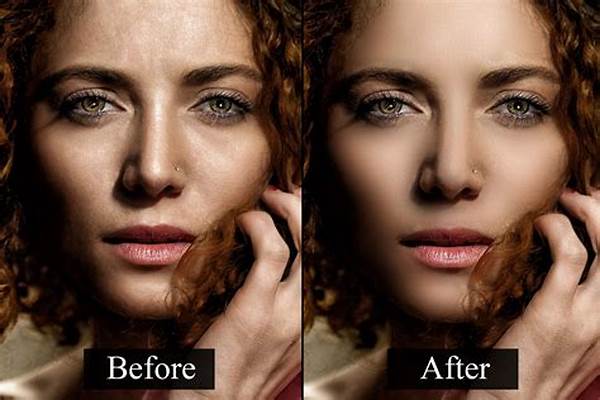
So, what exactly is image retouching effects comparison? Think of it as giving your photo a mini-makeover. Whether it’s for a professional portfolio or just to make your Instagram feed pop, this comparison helps you understand the variety of techniques available. From smoothing out skin tones to adjusting lighting, these effects give your photos an edge. It’s like trying on different outfits – some effects might make your image look glamorous, while others might go for a more natural vibe. By comparing different retouching options, you can choose the ones that best suit your aesthetic and purpose. And the best part? With a little practice, you don’t have to be a Photoshop wizard to master these skills!
Choosing the Right Software for Image Retouching Effects Comparison
1. Photoshop: This is the granddaddy of photo editing. Its vast array of tools make image retouching effects comparison a breeze.
2. Lightroom: Ideal for batch processing and quick edits, perfect for on-the-go comparisons.
3. GIMP: As a free alternative, GIMP offers robust features for those diving into image retouching effects comparison without breaking the bank.
4. Canva: Who said editing is hard? Canva simplifies retouching with its user-friendly interface.
5. Snapseed: Mobile-friendly, giving you the power of image retouching effects comparison right at your fingertips.
Tips for Beginners: Image Retouching Effects Comparison
Ready to dive deeper into the realm of image retouching effects comparison? Start by playing around with the basic adjustment tools such as brightness, contrast, and saturation. These might seem simple, but they lay the foundation for a striking image. Once you’re comfortable, experiment with skin smoothing tools to give portraits that professional studio look. And, if you mess up? No worries! The beauty of digital is that it’s all reversible, and you can always start over. Just remember, the goal is not to edit your image beyond recognition but to enhance its natural beauty and make it stand out.
Advanced Techniques in Image Retouching Effects Comparison
Unleash your inner photo editing ninja with these techniques for image retouching effects comparison:
1. Frequency Separation: Great for balancing texture and color.
2. Dodging and Burning: Adds depth by enhancing highlights and shadows.
3. Color Grading: Fine-tune your mood with precise tonal adjustments.
4. Cloning and Healing: Remove unwanted objects seamlessly.
Read Now : Elevating Photos To Visual Art
5. Layer Blending: Combine images for surreal effects.
6. Selective Color Adjustments: Make colors pop selectively.
7. AI Tools: Embrace cutting-edge tech for automated retouching.
8. HDR Toning: Achieve more dynamic range in photos.
9. Sharpening: Enhance image clarity where needed.
10. Noise Reduction: Smoothens images without losing detail.
The Impact of Image Retouching Effects Comparison on Your Portfolio
Hey photography buffs, if you’re looking to make your portfolio wow potential clients, image retouching effects comparison is your secret weapon. By thoughtfully choosing and applying different retouching techniques, you can showcase your skills and versatility. An impactful portfolio isn’t just about having stunning photographs; it’s about having photographs that tell a story. With the right touch-ups, you’re able to make that story even more compelling, drawing viewers in with enhanced details, vibrant colors, or a mood that perfectly encapsulates the images’ essence. Remember, your portfolio is your visual resume, so make every photo count!
Tricks of the Trade: Lessons from Image Retouching Effects Comparison
Yo! Let’s talk about the real-deal lessons you’ll snag from image retouching effects comparison. First up, patience is key. No one creates a masterpiece in one click. Experimentation? Make it your best bud—it’s where the magic begins, and happy accidents lead to the coolest outcomes. Keep learning and try out different effects; your skills are like fine wine—they only get better with age. And hey, don’t shy away from seeking inspiration or tips from fellow photo lovers online. The photography community is all about lifting each other up!
Wrapping Up: The Journey of Image Retouching Effects Comparison
So, my fellow photo warriors, as we wrap up our chat on image retouching effects comparison, remember—it’s all about exploration and having fun. Whether you’re a newbie trying to brighten up a hazy picture or a pro focusing on pixel-perfect detail, these techniques can cater to all. The digital editing world is an ever-evolving playground filled with endless possibilities. So go ahead, try out different edits, and see what works best for you. Your images are your canvas, and with each retouch, you’re adding a splash of your creativity to the world, one pixel at a time. Keep snapping and editing, and remember to proudly share your unique vision with the world!