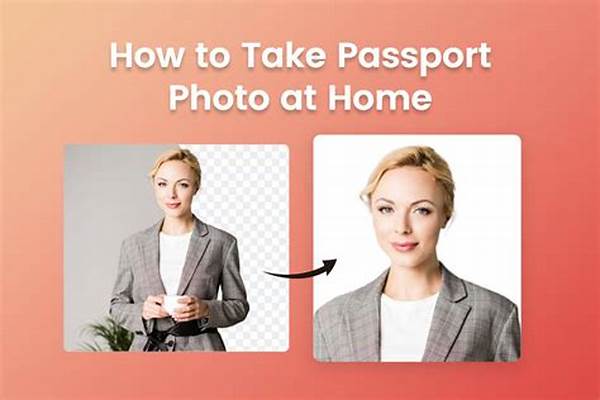
Hey there, savvy travelers! So, you’re planning your next big adventure and just realized you need a new passport photo. Before you rush to the nearest photo studio, why not try snapping that perfect pic right in the comfort of your own home? With just a few simple tools and a tad of creativity, you can create a professional-looking photo, all while chilling in your comfiest sweats. Let’s dive into the art of taking passport photos at home.
Read Now : Hybrid Cloud And Local Backup
Setting Up Your Home Studio
Taking a passport photo at home might sound daunting, but trust me, it’s easier than you think. First, find a well-lit spot in your home. Natural light is your best friend here, so aim for a space near a window during daytime. Ensure there are no harsh shadows by avoiding direct sunlight. If you can’t find a well-lit spot, a couple of strategically placed lamps will do the trick. Just make sure the lighting is even.
Next, consider the backdrop. Most official guidelines require a plain white or off-white background. A blank wall or a white sheet hung up can work perfectly. Avoid any textured or patterned backgrounds as they can complicate the approval process. Once you’ve set up your lighting and backdrop, it’s time to grab your digital camera or even your smartphone.
Remember, the key is patience. You might not get it right on the first try, but that’s okay. With a bit of practice, you’ll master how to take passport photos at home in no time. Make sure your face is at the center of the frame, chin up, and maintain a neutral expression. And voilà, you’re all set for shot after shot until you find the perfect one!
Essential Equipment for DIY Passport Photos
1. Camera or Smartphone: You don’t need fancy gear. A smartphone with a decent camera is sufficient for how to take passport photos at home.
2. Tripod or Steady Hand: A tripod helps keep the camera stable. Alternatively, a friend can lend a steady hand.
3. Proper Lighting: As mentioned, natural light or a couple of lamps ensures clarity and reduces shadows for how to take passport photos at home.
4. Plain Background: A simple white sheet or wall is essential for creating a compliant backdrop.
5. Photo Editing Tool: Software like Photoshop or even free online tools can help adjust brightness and crop the photo to the required size for how to take passport photos at home.
Handy Tips for Perfect Passport Photos
When diving into how to take passport photos at home, remember that preparation is key. First, ensure you’re well-groomed; a neat appearance goes a long way. Secondly, capture the photo at eye-level to avoid awkward angles. While you’re at it, take a few test shots and review the lighting and framing. If you’re struggling with shadows, reposition the lights or change spots.
Don’t forget about the dress code! Simple attires work best, and avoid any uniform-like clothing. If you’re wearing glasses, make sure there’s no glare and that your eyes are visible. Retake if needed, because patience is crucial when figuring out how to take passport photos at home. Don’t settle for the first pic; experiment until you find a keeper!
—
Common Mistakes When Taking Passport Photos at Home
Understanding how to take passport photos at home means learning from common mistakes. Here’s a rundown:
1. Uneven lighting can create shadows.
2. Busy backgrounds distract from your face.
3. Poor camera angles distort facial features.
4. Ignoring dress code guidelines.
Read Now : Step-by-step Photoshoot Backdrop Creation Guide
5. Unintentional facial expressions.
6. Wearing reflective glasses.
7. Incorrect photo size and resolution.
8. Over-editing the image.
9. Not checking photo guidelines.
10. Rushing the process and not experimenting with poses.
Editing Your Passport Photo Like a Pro
Congrats! You’ve taken your photo, but now comes the magic of editing. Knowing how to take passport photos at home means mastering a bit of editing. Using a simple editing tool, ensure your photo dimensions meet the passport requirements, usually 2×2 inches. Adjust the brightness and contrast to reflect natural skin tones without washing out features.
Crop your image so your face is centered and fills most of the frame. Remember, minimal editing is key, so go easy on the filters and photoshop tools. You can remove minor blemishes but stay away from altering your features. Once satisfied, save the photo in a high-resolution format like JPEG, and either print it at home or have it printed professionally.
Printing and Submitting Your Passport Photo
Once you’ve mastered how to take passport photos at home, and your editing game is on point, it’s time to print. Use high-quality photo paper for the best results, and ensure your print settings maintain the correct dimensions. If this feels like a hassle, local printing services or online photo services can print and deliver with ease.
With prints in hand, compare them against passport guidelines. It’s essential to double-check everything, from clarity to dimensions, to ensure your photo will be accepted. Armed with your perfectly printed passport photos, you’re now ready to complete your passport application, and soon, your travel dreams can come true!
—
Troubleshooting: What If It All Fails?
Sometimes, despite our best efforts, things don’t go as planned. Maybe the lighting wasn’t quite right, or the print quality wasn’t up to snuff. If troubleshooting these issues feels overwhelming, that’s okay! Learning how to take passport photos at home is a process.
Consider asking a tech-savvy friend for advice or seeking online resources and forums where other DIY enthusiasts share tips. If all else fails, remember that professional help is always an option. But hey, give yourself credit for trying something new and learning along the way. It’s all part of the adventure, and you’re one step closer to getting out there and exploring the world!