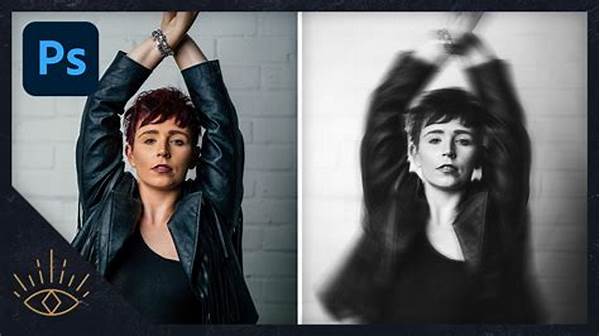
Hey there, photo enthusiasts! If you’ve ever seen those stunning images where parts appear blurred while others remain sharp, you’re in luck. Today, we’re diving into the world of motion blur photography. It’s that magical effect that brings movement to life in a still image. Curious? Great, let’s get started on how to create motion blur in photos!
Read Now : Budget-friendly Home Photo Project Ideas
Understanding Motion Blur
Before you rush out with your camera, let’s chat a bit about what motion blur is all about. Essentially, motion blur occurs when an object moves quickly, and your camera captures its path. This results in a beautiful, creative blur that suggests speed and movement. To achieve this, you’ll need to play around with your camera’s shutter speed. The rule of thumb? The slower the shutter speed, the more blur you’ll get. Imagine taking a picture of a busy street at night—you’ll get those cool light trails from car headlights. Now that we’ve got the basics down, let’s explore how to create motion blur in photos more deeply.
Essential Gear and Settings
Alright, here’s the scoop on what you’ll need. First, a camera that allows you to manually adjust settings, like a DSLR or a mirrorless camera. A tripod is your best buddy here because even a tiny shake can ruin your shot. Set your camera to Shutter Priority mode and start experimenting with different shutter speeds—slower speeds like 1/30s or slower generally work well. Remember, practice makes perfect when figuring out how to create motion blur in photos!
Tips to Nail Motion Blur Photography
1. Choose Your Subject Wisely: Not everything looks great with motion blur. Think about dancing, running, or cars speeding by.
2. Lighting Is Key: Make sure you’re working in good lighting. Low light can make the photographs appear grainy.
3. Use a Guide or Focus Point: It’s helpful to have a fixed point in your background or foreground to keep the focus on.
4. Experiment with Angles: Don’t just stick with one perspective; different angles can bring out different aspects of motion.
5. Check Your ISO Settings: Lower ISO results in less noise, but work that setting carefully depending on your light conditions.
Creative Ways to Use Motion Blur
Now, let’s get artsy! Using motion blur isn’t just for capturing fast-moving objects. It can add drama to a portrait by having the subject remain still while the background blurs. Or, capture the fluidity of water in a stream or moving waterfall. Whether you’re shooting a cityscape, nature, or even abstract art, knowing how to create motion blur in photos can really spice up your portfolio with its intriguing effects.
The Magic of Post-Processing
Don’t stop after you hit the shutter. Post-processing can enhance your motion blur images even more. You can increase the contrast to make the blurred and static areas more pronounced, or adjust color saturation for a vivid outcome. If you’re new to editing, tools like Adobe Lightroom offer various options to tweak your photos to perfection. Learning how to create motion blur in photos also means getting comfortable with a bit of editing—trust me, it makes a world of difference.
Common Mistakes and How to Avoid Them
Ah, the dreaded mistakes. Here are a couple of common pitfalls and how to sidestep them:
Read Now : Tips For Natural Portraits
1. Too Much Blur: Having everything blurred can lose the photo’s focal point. It’s crucial to decide what should be sharp.
2. Incorrect Shutter Speeds: Either too fast or too slow can ruin your shot. It’s all about understanding and adjusting as needed.
3. Ignoring Stability: Avoid handheld shots for very slow shutters—trust your tripod.
4. Overcomplicated Scenes: A chaotic environment might not work to your advantage.
5. Battery Drain: Long exposures mean you’ll burn through your battery faster, so keep spares!
Dive Into Creativity
So why not grab your camera and try it out? The beauty of learning how to create motion blur in photos is that there’s no right or wrong—you’ve got the freedom to explore and create art that suits your style. Remember, the world’s your oyster, and your camera is your paintbrush!
Wrapping Up Your Motion Blur Journey
Alright, we’ve covered a lot! From understanding the basics to avoiding common mistakes, you’re now equipped to go out and create some seriously stunning images. Remember, the key to mastering how to create motion blur in photos is practice, experimentation, and a dash of creativity. Get out there and let your camera capture the world in a whole new way—and have fun while you’re at it!
Phew, that was quite the photographic journey! But seriously, how to create motion blur in photos isn’t just a technique—it’s an art form. So next time someone asks, you’ll know exactly what to do. Now, go team blur! 📸✨


