Hey there, fellow photography enthusiasts! If you have a keen interest in capturing the tiniest details of the world around us, then macro photography might be your jam. Dive into the fascinating world of close-up shots that reveal the mesmerizing intricacies of everyday objects and nature. One of the secrets to nailing those perfect macro shots is mastering your lighting setup. But fear not! You don’t need to break the bank to get started. Today, we’re diving into some practical DIY lighting setups for macro photography that’ll have you light up your shots like a pro.
Read Now : Enhancing Photos Using Software
Creating Your Own Lightbox for Macro Shots
Lighting plays a crucial role in macro photography, and creating a DIY lightbox can be an absolute game-changer for your images. Picture this: you have a makeshift mini studio right at home, perfectly designed for capturing those detailed, tiny wonders. Constructing a lightbox is not only budget-friendly but also incredibly simple. All you need are a few household items like a cardboard box, some white tissue paper or a light cloth, and a couple of small lamps or LED lights. Cut out windows on either side of the box, cover them with the white paper to diffuse the light, and bam, you’ve got yourself a dreamy setup!
Starting with a DIY lightbox will allow you to control the lighting environment and avoid those pesky shadows that can ruin an otherwise perfect shot. It’s truly amazing how these diy lighting setups for macro photography can transform your images from “meh” to marvelous with just a little bit of creativity and effort. This setup is perfect for photographing small objects like jewelry, miniature figurines, or even insects (if you can keep them still!). Experiment with different angles, distances, and light sources to find that sweet spot that showcases your subject in the best light.
The beauty of DIY lighting setups for macro photography lies in the flexibility and experimentation. With your newfound lightbox, try playing with light intensities and colors by using different types of bulbs or even covering the lamps with colored cellophane. This setup can lead to some exceptionally unique and artistic shots that you won’t get with a standard setup. Remember, macro photography is all about exploring the tiny world with a big heart, and getting creative with your lighting is just the start of that adventure.
Using Household Items for DIY Lighting
Mastering Natural Light for Macro Photography
Harnessing the power of natural light can make a world of difference in your macro shots. Early mornings and late afternoons offer the softest, most flattering light for photography. The warm hues of the golden hour can beautifully enhance the textures and details of your subject. Position your set near a window or outside, and watch as the natural glow vividly brings your tiny subjects to life.
For those of us keen on diy lighting setups for macro photography, combining natural light with a couple of simple homemade reflectors can amplify the results dramatically. Reflectors made from white cardboard or aluminum foil can redirect and soften the natural light, eliminating harsh shadows and providing an even lighting that wraps gently around your subject. Remember, the aim is to complement the natural highlights and shadows, not to overpower them.
Experimenting with natural light also means taking advantage of the ever-changing weather conditions. Cloudy days can serve as giant diffusers, offering soft, ambient light perfect for macro photography. Plus, a little drizzle can add beautiful texture to plant surfaces or flower petals, making your shots even more captivating. So, grab your camera, scout the perfect naturally lit spot, and let your subject bask in the glory of Mother Nature’s lighting.
Budget-Friendly LED Light Setups
Creating effective diy lighting setups for macro photography doesn’t have to cost a fortune. With just a few LED clip lights and some creativity, you can achieve studio-quality shots at home. First, consider acquiring small LED reading lamps that have adjustable necks. These lights can be positioned to precisely illuminate your subject, reducing unwanted shadows and emphasizing details.
Next in line, grab a couple of plain, white lampshades or small diffusers to soften the LED lights’ output. Harsh lights can cause glare or unnecessary highlights on your subject, but a proper diffuser will offer a softer, more flattering light. DIY diffusers could include baking parchment or even white plastic bags. With these in place, your DIY lighting setups for macro photography will shine brightly enough to make your close-up images pop!
Further encourage a dynamic lighting environment by incorporating color gels over your LED lights. These gels come in various shades and can drastically alter the mood or tone of your macro shots. Using this budget-friendly approach, you’re free to explore any style you desire. Capture delicate dewdrops with a cool blue ambience, or highlight searing reds on autumn leaves. The possibilities with diy lighting setups for macro photography are as endless as your imagination.
Experimenting with Flash Diffusers
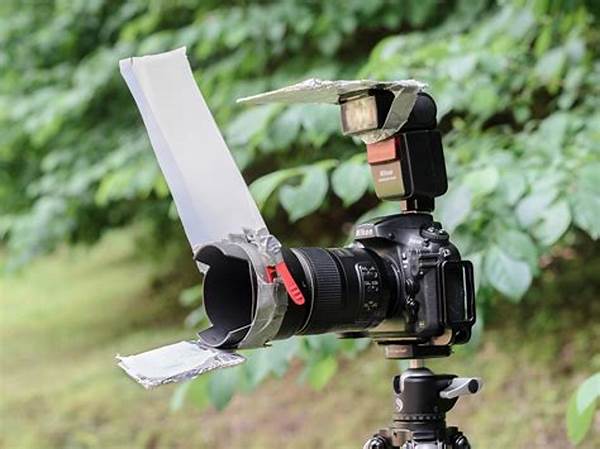
Are you one of those folks who has a love-hate relationship with flash photography? I get it; sometimes the flash can be way too harsh on our delicate macro subjects. But fret not, because DIY lighting setups for macro photography can easily incorporate diffused flash for sensational results. First off, you can create a simple diffuser using items like a clean, white plastic container. Cut off the bottom, pop it over your flash, and voilà! You’ve got yourself a softbox that will spread the light more evenly.
Read Now : Organize Digital Photo Collections Efficiently
Now, here’s the secret to making this work: play around with the shape and size of your diffuser until you find what suits your needs and subject best. Remember, light is a bit like magic – it’s all about experimentation! Take some time to adjust your camera settings as well, ensuring that the exposure isn’t washed out by too much flash.
Ever thought of using a Pringles can as a flash bouncer? Well, folks, it’s a pretty neat trick! Cut out the bottom; attach some aluminum foil on the inside, and you’ve got yourself a super-reflector that redirects light wherever you need it most. These DIY lighting setups for macro photography give you space to play around with your strengths, letting you capture shots with the right amount of flair and detail. Who knew snack time could lead to artistic brilliance?
Slang and Swag: Lighting Your Macro Photography
Yo, macro photography peeps! Ever felt like you gotta flex those DIY lighting setups for macro photography skills but need a bit of help? Pull up a seat, ’cause we’re dropping some lit DIY tips that’ll amp up your close-up shots. You know, that feeling when you snap a masterpiece with just a little household wizardry? Pure gold!
First things first, all you need are basics — think flashlights, foil, and a dollop of ingenuity. DIY lighting ain’t about breaking the bank; it’s about making whatever you got work like magic. Hit up those thrift stores or dig through that drawer of forgotten gadgets. Your next epic lighting rig might just involve a lampshade and some aluminum foil. Yeah, you heard right!
Speaking of dope setups, remember the key is keeping that light natural and smooth. Nobody wants a photo with blown-out highlights and ghastly shadows. That’s a no-go zone! So, keep it chill, tap into your creative prowess, and light up your macro photography world in style! Keep on snapping those mind-blowing details and letting your macro love shine, one DIY right after another.
Wrapping It Up
Alright, photography enthusiasts, we took quite the journey through the wonders of dish-dash diy lighting setups for macro photography! From whipping up your own lightbox to rocking some thrift shop LED arrangements, there’s so much you can explore without breaking the bank. Every creative DIY experiment unlocks new potentials behind those lenses, and that’s the beauty!
Remember to always stay curious and open to experimentation—macro photography is all about those teeny details and epic close-ups that wow. By constructing various setups and toying with light sources, you’re well on your way to becoming the DIY photography prodigy you always knew you could be! Keep that camera loaded and click away!
So go ahead, channel your inner MacGyver, and let those creative juices flow. Each new concept and trick you discover only brings you closer to mastery. Embrace it all, as every setup is a step into a world where even the tiniest subject can be your next grand project! With these DIY skills, you’re no longer just any shutterbug—you’re a macro genius in the making!