Hey there! So, you’ve spent a fortune on that shiny new camera and you’re ready to dive into the world of portrait photography. But wait, what’s the deal with ISO settings? You may wonder, “Why is the correct ISO for outdoor portraits such a big deal?” Well, I’m here to break it all down in a totally chill and friendly way. Let’s dive into this world of shutterbugs, where light is everything, and the right ISO setting can make or break your masterpiece.
Read Now : Approaches To Ease Portrait Subjects
Understanding the Basics of ISO
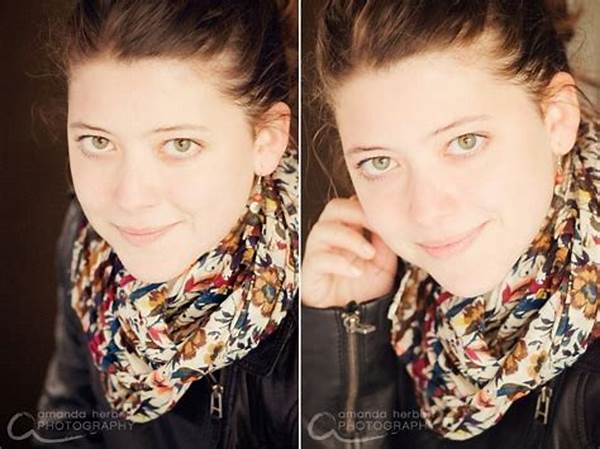
When you’re out shooting portraits under the beautiful, natural light of the outdoors, getting the correct ISO for outdoor portraits can be a game changer. Think of ISO as your camera’s sensitivity to light. A lower ISO means less sensitivity, which is perfect for super sunny days. High ISO settings? They’re your go-to for capturing moments in lower light without a flash. So when it comes to getting that perfect shot, understanding how to adjust your ISO is crucial.
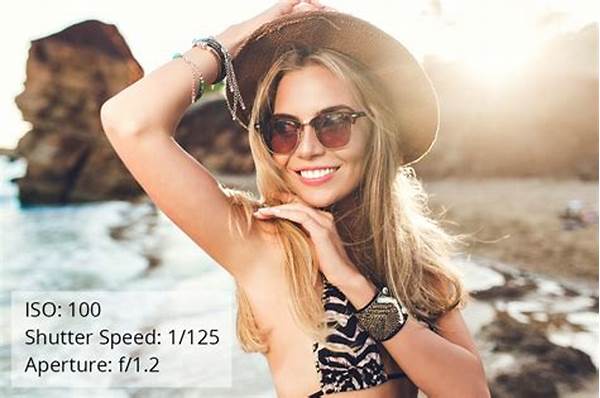
The magic number for the correct ISO for outdoor portraits often ranges between 100 to 400. On bright sunny days, an ISO of 100 is typically spot-on, giving crisp details and vibrant colors. However, if the weather’s a bit overcast, don’t hesitate to bump it up to 200 or 400. The goal is to keep your photos looking natural and free from that pesky graininess known as “noise.” Remember, while a higher ISO captures more detail in lower light, it might introduce noise to your image. So, achieving that balance is key!
Quick Tips for ISO in Outdoor Portraits
1. Always start with the lowest ISO setting and work your way up if needed.
2. Consider your lighting. On sunny days, stick to ISO 100.
3. Overcast days? Pump it up to ISO 200 or 400 for the correct ISO for outdoor portraits.
4. Be mindful of noise when using high ISO settings.
5. Use a tripod for stability if you’re shooting in lower light conditions.
Adjusting ISO for Different Outdoor Conditions
Sunshine, clouds, golden hour—so many elements to consider, right? When seeking the correct ISO for outdoor portraits, don’t forget these fun little nuggets. Golden hour, for instance, offers softer lighting, allowing for a lower ISO like 100. But with rapid-changing weather conditions, keep your ISO settings flexible.
In the middle of a partly cloudy day, light changes in a snap. This scenario demands a bit of quick thinking. The trick? Start with ISO 100 and adjust based on changing light intensity. It’s like a dance, adapting gracefully to Mother Nature’s whims. By keeping tabs on your surrounding light, your photos will turn out both dynamic and stunning.
Experimenting with ISO for Outdoor Portraits
1. Sunny Days: Embrace low ISO settings.
2. Cloudy Days: Bump that ISO slightly higher.
3. Golden Hour: Soft light means softer ISO.
4. High Contrast: Adjust as needed for balance.
5. Shaded Areas: Explore higher ISO settings.
Read Now : Personalized Baby Photo Props
6. Backlit Subject: Compensate with higher ISO.
7. After Sunset: Low light requires higher ISO.
8. Motion Shots: Higher ISO helps with faster shutter speeds.
9. Unique Lighting: Play around with settings.
10. Artistic Intent: Break the rules for creativity!
Choosing the Right Camera Settings
Understanding ISO, aperture, and shutter speed together is essential for nailing that perfect outdoor portrait. We’re focusing on the correct ISO for outdoor portraits here, but let’s not leave the other two out in the cold. An aperture setting of around f/2.8 to f/5.6 lets in enough light, ensuring your subject stands out against a beautifully blurred background.
Shutter speed plays a role, too. A faster shutter speed stops motion in its tracks, while a slower one lets you capture light and motion artistically. But remember, with great control comes great responsibility! Balancing these three facets—the exposure triangle—gives you the reins to control the outcome of your photos, ensuring each portrait is a masterpiece.
The Slang on Setting ISO
Yo, photog fam! ISO settings can be hella tricky if you’re new to the game. But don’t trip! The correct ISO for outdoor portraits is your bestie for those bomb shots. Think of it like your flexibility mode, adapting to whatever natural light throws your way. Sunny? ISO 100. Cloudy? Pump it up. Golden hour? Magic time for low ISO.
For those epic outdoor snaps, always keep your eyes peeled on the lighting front. When the sun decides to play hide and seek with the clouds, just chill and tweak your ISO settings to match. It’s kinda like adjusting that fresh pair of shades—just find the vibe and roll with it.
Wrapping It Up
Alright, folks, let’s wrap it up. When it comes to capturing jaw-dropping images, understanding the correct ISO for outdoor portraits is a must. It may seem like a small setting on your camera, but it makes all the difference in getting those drool-worthy snaps. Exploring different light conditions and ISO settings opens up a world of creativity, allowing you to mold every photo to your artistic vision.
Whether you’re shooting in the blazing sun or capturing the moodiness of a cloudy day, always remember to assess your environment and adjust your ISO from there. A little experimentation goes a long way, and soon enough, you’ll have a handle on your camera’s capabilities. So go out, click away, and let that artistic brilliance shine through in every portrait you capture!