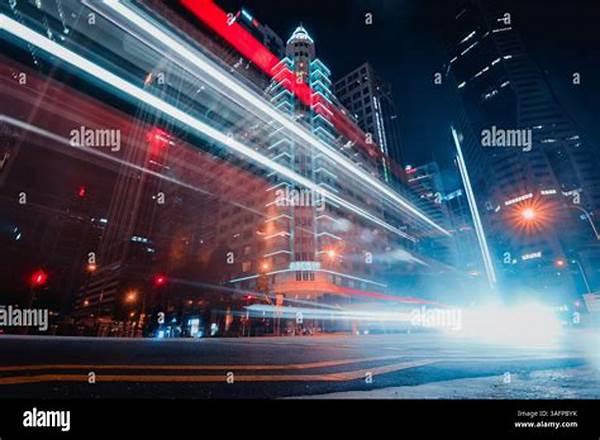
Hey there, fellow photography enthusiasts! Have you ever strolled through a bustling city at night and felt mesmerized by the streaks of light blazing through your surroundings? Capturing city light trails is an art form that captures the dynamism and beauty of urban life. If you’ve ever wanted to learn the tricks of the trade, you’re in the right place! Let’s dive into the world of light trail photography and explore how to create stunning visuals of bustling cityscapes.
Read Now : Photo Editing Transformation Examples
Mastering Light Trail Photography
Capturing city light trails is all about using your camera to harness the beauty of moving lights in an urban environment. It’s kind of like painting but with headlights and neon signs as your brushstrokes. You might be wondering, “Do I need fancy gear to achieve this?” Well, not necessarily! While a tripod is your best friend for keeping those long exposure shots steady, all you really need is a camera with manual settings. Play around with shutter speeds and see the magic happen as the headlights blend into vibrant, colorful stripes.
Now, let’s talk timing and location. The best time for capturing city light trails is during the ‘blue hour’ – that magical time right after sunset when the sky is a deep, enchanting shade of blue. It sets a perfect backdrop for the glowing city lights. As for locations, busy streets, overpasses, or bridges can offer you the most dynamic light trail shots. Remember, safety first! Always find a secure spot where you can work your creative magic without worrying about traffic or pedestrians.
Lastly, a big part of capturing city light trails is practice and experimentation. Don’t be afraid to try new angles or increase the exposure time beyond what you initially planned. Each attempt will teach you more about how to harness the light and motion in your frame. The urban jungle is your canvas, and there’s no limit to what you can achieve!
Must-Have Gear for Capturing Light Trails
1. Tripod: A tripod is crucial for keeping your camera steady during long exposure shots.
2. Camera with Manual Settings: Being able to control the shutter speed is key for capturing city light trails.
3. Wide-Angle Lens: A lens that can capture a wide view is perfect for cityscapes.
4. Remote Shutter Release: This handy tool helps reduce camera shake, resulting in sharper images.
5. Neutral Density Filter: This filter is excellent for preventing overexposure during long exposures in well-lit conditions.
Tips and Tricks for Stunning Light Trails
Ready to elevate your photography game with stunning light trail shots? Start by scouting locations before nightfall and plan your angles. Consider using reflections in puddles or buildings to amplify the effect. Wonder about those perfect settings for capturing city light trails? A good starting point is setting your aperture to f/8 or f/11 and experimenting with shutter speeds between 10 to 30 seconds.
Another great tip is to use the ‘bulb’ mode on your camera for total control over your exposure duration. When capturing city light trails, try focusing on the initial passing cars, then manually adjusting the focus ring to ensure sharpness. Lastly, always review your shots and tweak settings as needed to achieve the desired effect.
The Creative Process Behind Light Trails
When you’re capturing city light trails, it’s all about capturing the essence and energy of the city. The beauty lies in the unpredictability of each shot. Sometimes the trails will be smooth, and other times they’ll have a jagged, abstract feel to them. It’s up to you to create a story or find a rhythm in the patterns you capture.
Taking it a step further, think about how you can incorporate light trails into a series of images. Maybe you document one street as it transitions from the hustle and bustle of rush hour into the serene calm of late night. This storytelling aspect adds depth to your collection and engages viewers on a different level. Light trails are more than just streaks of light—they’re a reminder of city life in constant motion.
Common Challenges When Capturing Light Trails
1. Dealing with Overexposure: It’s easy to overdo the exposure when capturing city light trails. Keep an eye on your histogram for early signs.
2. Weather Conditions: Rain or excess fog can make or break your shot, adding unwanted blur or beautifully diffusing the lights.
3. Distractions: Sometimes other elements like pedestrians or cyclists can photobomb your perfectly lined shot.
Read Now : Cheap Wedding Photography Deals
4. Camera Shake: Even a minor shake can ruin a long exposure. Ensure your tripod is on stable ground.
5. Focus Issues: It can be tricky to achieve precise focus in low light. Pre-focusing on a point using manual focus often helps.
6. Setting Selection: Getting the right settings can take time. Don’t get frustrated—trial and error is your friend here.
7. Battery Life: Long exposure shots can drain your battery fast. Always keep a spare or two handy.
8. Composition Complexity: Composing your frame in a way that captures both the light trails and the cityscape can be challenging.
9. Busy Backgrounds: A cluttered background can detract from the light trails. Finding the right backdrop is key.
10. Learning Curve: Capturing city light trails has a learning curve, but patience and practice will yield rewarding results.
Discovering the Best Spots for Capturing Light Trails
If you’ve ever wondered where seasoned photographers go to capture the most epic city light trails, you’re not alone! Timing and location are crucial in catching those Instagram-worthy shots. Start with iconic city bridges or elevated spots that overlook busy highways. That perfect vantage point might just be right above your head!
But hey, don’t limit your creativity—parking garages, rooftop bars, and even pedestrian paths can offer unique perspectives for capturing city light trails. The key is to look at the urban landscape with fresh eyes and imagine how the lines of motion created by speeding vehicles can add to your composition. Happy shooting!
Editing Your Light Trail Photos Like a Pro
Alright, so you’ve spent an exhilarating evening capturing city light trails, and now it’s time to dive into the editing process. First things first—start by adjusting the basic settings such as exposure, contrast, and saturation. These small tweaks can make your light trails pop!
Consider using software like Lightroom to fine-tune the details. Highlight specific areas that you want to stand out more, and be adventurous with colors! Sometimes, slightly increasing the vibrancy can transform a good image into a great one. Subtle dodging and burning can also add depth to your photos. Remember, editing should enhance your captures, not overshadow them.
Technology and Innovation in Capturing Light Trails
We live in a time where technology offers countless possibilities in photography, especially when capturing city light trails. With drones becoming more accessible, now you can take your shots airborne, offering a bird’s-eye view of the luminous trails. Imagine combining aerial shots with the rich tapestry of city lights to create a magical twilight scene.
Moreover, AI-powered editing tools and mobile apps now allow you to experiment with your photos right from your smartphone. Capturing city light trails no longer requires a professional camera setup. It’s about how creatively you use the technology to express your vision in the vibrant dance of city lights.


