Hey there, fellow photography enthusiasts! Ever wondered how to capture that dreamy, soft motion in your photos? You’ve seen those stunning images where the waterfall looks like silky threads or traffic lights blur into vibrant streams. Yup, that’s the magic of motion blur! Getting the right camera settings for motion blur can elevate your shots from ordinary to extraordinary. So, let’s dive into a world where your camera can slow down time and create visual poetry.
Read Now : Watermark Videos Free Software
Understanding Camera Settings for Motion Blur
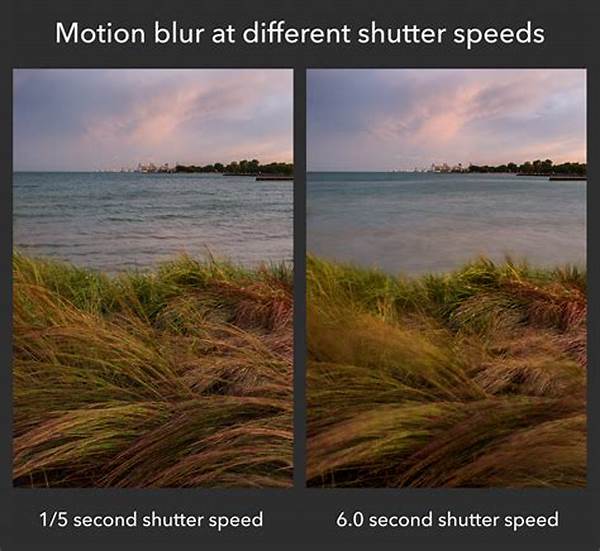
Navigating camera settings for motion blur might sound a bit technical, but trust me, with some practice, you’ll ace it! At the heart of this technique is the shutter speed. This setting is like the magician’s wand that allows motion to flow gracefully across your photos. The slower the shutter speed, the more blur you capture. But, remember, it’s a balancing act! If it’s too slow, everything might be too blurred to tell what’s going on. Ideally, you want to experiment with speeds like 1/30 or even slower, and then adjust according to how much blur you want.
Now, what’s equally important is the lighting. Shooting in low-light conditions can dramatically enhance motion blur effects without overexposing the image. Here’s a little tip—use a Neutral Density (ND) filter. It’s like sunglasses for your camera, letting you slow down the shutter speed without burning out the highlights. Another aspect of camera settings for motion blur is stability. A tripod here is your best friend, holding your camera steady while the world around moves. This ensures the static elements of your photo remain crisp, adding contrast to the blur.
So grab your camera, head out to a bustling street or a cascading waterfall, and start experimenting with these tips. Soon, you’ll master the camera settings for motion blur and watch your creative vision unfold. It’s all about practice, patience, and a pinch of creativity. Keep experimenting, and before you know it, you’ll nail those perfect shots that speak volumes without words. Happy shooting!
Quick Tips for Camera Settings for Motion Blur
1. Shutter Speed Magic: Slower shutter speeds are perfect for achieving that beautiful blur. Try starting with 1/10 to 1/30 and adjust from there. Camera settings for motion blur begin here!
2. Lighting Matters: Low light is your friend for motion blur. Less light means you can open that shutter longer without overexposing.
3. Use a Tripod: Prevent unwanted shaking with a tripod. Camera settings for motion blur require stability, especially when focusing on stationary objects.
4. Neutral Density Filters: Essential for daylight shots, these “shades” for your camera let you extend shutter speed without blinding highlights.
5. Manual Mode Mastery: Becoming familiar with manual mode puts you in the driver’s seat of your camera settings for motion blur. Tweak settings as needed for the perfect shot.
Gear Essentials for Camera Settings for Motion Blur
When venturing into the world of motion blur, having the right gear can make a world of difference. Imagine trying to catch that dreamy waterfall scene or busy street with just your hands—it’s shaky, right? Enter the tripod! It’s a solid investment and offers the stability needed to keep certain parts of your image sharp while the surrounding elements blur into motion. A sturdy tripod is a must-have for mastering camera settings for motion blur, providing a firm foundation for those long exposures.
Adding a Neutral Density (ND) filter to your kit is like letting your camera wear sunglasses. Ever tried photographing a sunny street or a bright waterfall only to end up with a washed-out image? An ND filter reduces the amount of light hitting your sensor, allowing for longer exposures even in direct light. This is a game-changer when fine-tuning your camera settings for motion blur during the day. With these essentials in your photography arsenal, you can comfortably play around and perfect your shots, creating images that not only capture action but tell a story through motion and time.
Troubleshooting Camera Settings for Motion Blur
1. Too Much Blur?: Reduce the shutter speed for less blur. Camera settings for motion blur require a delicate touch.
2. Image Too Bright?: Use an ND filter or lower your ISO. These adjustments are critical in camera settings for motion blur.
3. Unwanted Elements Moving?: Pick a different focal point or adjust focus settings.
Read Now : Comparison Of Free Apps For Image Watermarking
4. Vibration Issues?: Use a remote trigger or timer to click the picture.
5. Background Distractions?: Choose a new angle or reframe the shot.
6. Lighting Fluctuations?: Consider nighttime settings or wait for dusk.
7. Non-Distinct Subjects?: Adjust aperture size for more depth of field.
8. ISO Dilemmas: For less noise, maintain lower ISO levels.
9. Color Saturation Issues: Adjust in post-processing if required.
10. Sharpness Difference: Focus manually or use fine-tune autofocus. Camera settings for motion blur depend on practice!
How to Practice Camera Settings for Motion Blur
Alright, aspiring blur capturers! Practicing with camera settings for motion blur is a mix of patience and playful experimentation. Start with simple subjects like cars passing by or waves crashing against the shore. Gradually experiment with different shutter speeds to observe how motion blur imparts various effects. It’s fascinating how a setting might create a creative blur for a flowing scarf but require an adjustment for a bustling crowd.
One of my favorite practice sessions was at a local carnival. The vibrant lights and spinning rides presented the perfect opportunity to test different settings. How did the slow shutter speed fare? It transformed the ferris wheel into a mesmerizing whirl of colors, revealing the masterpiece that camera settings for motion blur can create. Remember not to get frustrated—it’s a learning curve. The more you shoot, the better you’ll understand how light, motion, and time can meld into beautiful snapshots. Document your progress, tweak settings without hesitation, and, above all, enjoy the journey toward mastering motion blur!
Captivating Shots with Camera Settings for Motion Blur
So, you’ve got the basics down with motion blur, but how about creating some truly captivating shots? Imagine capturing a serene lake where the reflection ripples softly or freezing a dance move in vibrant color trails. This is where your camera settings for motion blur become your creative palette. Keep exploring different locations and unique lighting conditions. Each new location offers a fresh canvas to test your skills.
Play around with combining natural and artificial lights for dramatic effects. Picture the photo: a city skyscraper elegantly reflects golden sunset hues, while below, car lights streak across the frame—pure magic via camera settings for motion blur. Once you’ve dabbled enough, start focusing on your post-processing skills. Simple tweaks can remarkably enhance the photo, emphasizing the contrast between sharp and blurred elements. You’ll find a striking balance where each motion blur click adds a dash of creativity to your portfolio, keeping your artistic lens ever curious and lively.