Hey there, fellow photography enthusiasts! If you’re diving into the world of portrait photography, you’ve probably stumbled upon the daunting task of mastering your camera settings. It might seem a bit overwhelming at first, but there’s one aspect that’s absolutely crucial: the ISO settings. In the quest for that perfect portrait, understanding and manipulating ISO settings can be a game-changer. Join me on this laid-back journey as we unravel the secrets to the best ISO settings for portraits, making your portraits not just good but spectacular.
Read Now : Responsible Animal Testing Practices
Understanding ISO for Portraits
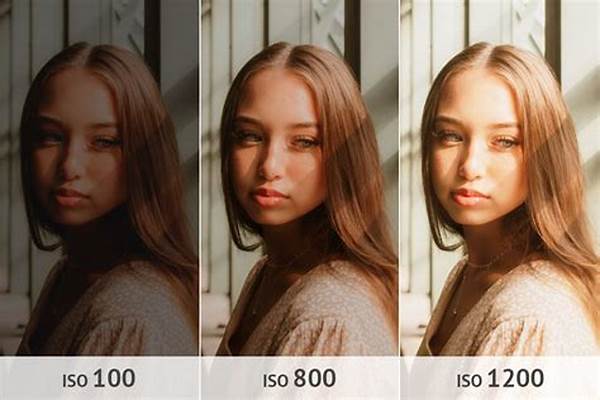
So, what’s ISO, and why should you care about it when snapping portraits? ISO is basically your camera sensor’s sensitivity to light. The lower the ISO, the less sensitive, resulting in less grain and clearer images, which is exactly what we want in portraits. However, when shooting in low light, bumping up that ISO is essential to maintain clarity without making your portrait look like a grainy old movie. Typically, the best ISO settings for portraits range from ISO 100 to 400, especially in well-lit environments. This ensures images are crisp and noise-free. But remember, every lighting scenario is unique, so sometimes you might need to venture higher. Just be cautious of noise!
Tips for Finding the Best ISO Settings for Portraits
1. ISO 100 to 200 for sunny days: Perfect when you’re outdoors with plenty of sunlight. Your images will be sharp and noise-free.
2. ISO 400 for shade: Moving to a slightly lower light, ISO 400 can save the day, providing great clarity with minimal noise.
3. ISO 800 to 1600 for indoors: When you’re inside and the lighting isn’t optimal, these settings help maintain image sharpness.
4. ISO 3200 for low-light events: Let’s say you’re at a candlelit dinner – bumping your ISO can capture the moment while keeping some ambiance.
5. Experimentation is key: Every setting is a bit different. Don’t hesitate to tweak and experiment to find those optimal settings for your specific scenario.
Best ISO Settings for Different Portrait Scenarios
Isn’t it super cool how you can tailor your ISO to fit different setups when capturing portraits? Let’s dive into a couple of situations you might encounter:
Read Now : Depth Perception In Framing
1. Golden Hour Magic: Early mornings or late afternoons, use ISO 100-200 to capture that magical light!
2. Indoor Natural Light: Harness window light and stick to ISO 400-800 for those dreamy, soft portraits.
Practical Tips on Best ISO Settings for Portraits
Now, put your newfound knowledge into action. Start by ensuring you’re familiar with your camera’s ISO range. It’ll make tweaking the settings far less intimidating. Always keep an eye on the lighting conditions and have your tripod handy for those low light situations to avoid camera shake. The best ISO settings for portraits aren’t a one-size-fits-all; it’s about adapting to your environment and creatively solving challenges. Trust me, some trial-and-error will lead you to harnessing the perfect shot!
Real-world Application of Best ISO Settings for Portraits
Imagine you’re shooting at a lively outdoor park with glorious sunlight. You’d want to keep your ISO at around 100 or 200, hitting that sweet spot between light and clarity without noise. Conversely, capturing portraits at a cozy evening indoor party requires turning up the ISO to perhaps 1600 to keep those faces beautifully detailed amidst lower lighting. Balancing lighting and ISO is essential for ensuring your portraits stand out while showcasing your subject’s depth and personality. Experiment, explore, and you’ll get there!
Summary of Best ISO Settings for Portraits
Alright, let’s wrap this up! To nail the best ISO settings for portraits, remember it’s all about balance. Lower ISOs shine in bright light, keeping things sharp, while higher ISOs come to the rescue in dimmer conditions. A keen eye for lighting, practice, and a sprinkle of patience can help you master ISO settings. Keep this guidance in your back pocket, and you’re well on your way to capturing stunning portraits that friends and clients will adore. Happy shooting!