Hey there, fellow photography enthusiasts! Let’s dive into the magical world of portrait photography, where capturing a person’s essence is the ultimate goal. But, what have we here? The infamous ISO setting. It can be a photographer’s best friend or worst nightmare. In our quest for the best ISO for portrait photography, we’ll uncover the secrets of mastering this vital camera setting to make your portraits truly stunning. Grab your camera, and let’s geek out on some ISO magic!
Read Now : Framing And Viewer Psychology
Understanding ISO: Your Portrait’s Best Friend
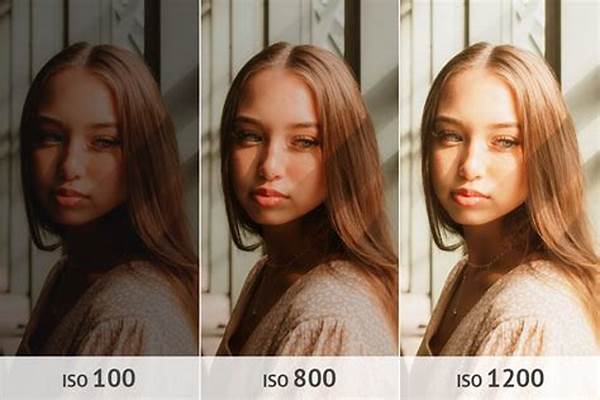
Picture this: You’re out capturing an intimate portrait session, but as the light shifts, so does your mood. This is where understanding ISO becomes your saving grace. The ISO setting on your camera measures how sensitive the image sensor is to light. The best ISO for portrait photography often ranges from 100 to 800, depending on your lighting situations. Ideally, you’d use the lowest ISO setting possible to maintain image quality and avoid grainy photos. For instance, if you’re shooting in bright sunlight, ISO 100 would be perfect, while an indoor setting might require you bumping it up a bit. Master this, and you’ll be creating magic in no time.
Why does ISO play such a critical role? Well, the secret to capturing detailed and sharp portraits lies in controlling the noise in your image. High ISO can lead to graininess that can overshadow those fine details you want to showcase, especially in low light. However, when it’s balanced with aperture and shutter speed, ISO becomes an ally, helping you maintain that creamy background blur and razor-sharp focus. So, next time you set out with your camera, keep the best ISO for portrait photography in mind, and watch your portraits transform into artful creations.
Mastering ISO also means understanding your camera’s capabilities. Every camera model reacts differently to ISO settings, and sometimes a good practice session is what you need to see how high you can push it before quality is compromised. Familiarize yourself with your equipment to confidently choose the best ISO for portrait photography for every shoot scenario. Remember, it’s all about finding that sweet spot where the ISO enhances rather than detracts from your stunning portrait work.
Tips to Choose the Best ISO for Portrait Photography
Getting that perfect shot combines many settings, but hitting the best ISO for portrait photography can make your images shine without that pesky noise ruining the mood. Trust in your skills and experiment with different settings!
ISO and Your Camera: Getting Personal
Knowing the best ISO for portrait photography begins with understanding your camera’s personality. Just like we all have that one quirky friend, every camera has its behavior when it comes to ISO. That means what works on your friend’s Nikon D850 might look different on your Canon EOS R5. By spending time shooting in various lighting conditions, like at the beach or your cozy coffee spot, you’ll learn what ISO setting suits each scene best.
Another pro tip? Dive into your camera’s menu settings to familiarize yourself with noise reduction options. These nifty settings can aid in minimizing the grainy effect of higher ISOs during post-processing. Also, certain cameras have dual-native ISO features that might surprise you with their ability to handle low-light situations cleanly. So, get out there, test the limits, and find the appropriate best ISO for portrait photography for your gear. You’ll thank yourself when your photos come out looking as dreamy as a Pinterest mood board.
Mastering ISO for Picture-Perfect Portraits
When it comes down to mastering the best ISO for portrait photography, it might seem like solving a math problem at first. But just like any good puzzle, it becomes clear with practice. Here are some key explanations to guide you:
Common Mistakes to Avoid with Best ISO for Portrait Photography
In your quest to find the best ISO for portrait photography, there are some mistakes you might want to sidestep. It’s easy to go overboard with pushing ISO when chasing that perfect exposure, especially when shooting indoors or in low light. This often results in grainy photos, which might be artsy sometimes, but not ideal for clear, professional portraits. Always aim to keep ISO as low as possible, bumping it only when absolutely necessary.
Read Now : Utilizing Negative Space Effectively
Another common misstep is relying solely on ISO to fix exposure issues. Remember, ISO is just one piece of the exposure triangle puzzle. It needs to work harmoniously with shutter speed and aperture to yield the best results. Instead of cranking ISO to bring light into your image, try slowing down your shutter speed or opting for a wider aperture. By keeping these elements balanced, you’re more likely to achieve that sought-after crisp look that defines top-tier portrait photography. And finally, make it a habit to regularly update and calibrate your camera’s software, ensuring it’s operating at peak efficiency.
My Favorite Times to Use Adjusted ISO
Alright, so let’s chat about those times when adjusting the ISO makes all the difference. Ever been chilling during golden hour? Yeah, you know—that gorgeous, soft, warm light that magically appears about an hour before sunset. It’s a great time to capture breathtaking portraits. But, you don’t get to control how fast it changes, right? That’s when tweaking your ISO to around 200-400 can create magic without any grainnasties creeping in.
Now, when night falls, say you’re at a cozy, dimly lit cafe, and your friend is laughing under the twinkle lights—well, then you might want to go brave and roll with an ISO closer to 800-1600. It’s adventurous, but hey, these moments are worth it. A little noise can always be smoothed out later, but capturing that perfect candid is just pure gold. So, next time you’re out, remember the best ISO for portrait photography for these dreamy scenarios and adjust away!
Finding Your Groove: ISO and Portraits
In wrapping up this delightful ISO journey, here’s a little nugget to chew on: There’s honestly no one-size-fits-all when it comes to choosing the best ISO for portrait photography. The magic lies in finding that rhythm between your scene’s lighting, your camera’s capabilities, and your own stylistic touch. Get comfortable shooting across a spectrum of lighting environments, and soon enough, deciding on the perfect ISO will become second nature to you.
And remember, practice truly makes perfect. So, set aside some time, grab your camera, venture into different lighting scenarios, and tweak away. Whether it’s sunny landscapes, soft indoor light, or a twilight scene, every click is a step closer to mastery. Over time, your instincts will sharpen, and the best ISO for portrait photography will shift from a technical term into the heart of your creative strumming. Happy shooting!


