Hey there, photography enthusiasts! If you’ve ever delved into the world of portrait photography, you’ve probably heard chatter about ISO settings and their magical powers. Adjusting ISO for outdoor portrait quality isn’t just some technical mumbo-jumbo; it’s a real game-changer when it comes to capturing those crisp, beautiful images. Let’s dive into how tweaking the ISO can transform your outdoor portraits from “nice” to “whoa!”
Read Now : Advanced Color Grading Techniques
Why Adjusting ISO Matters
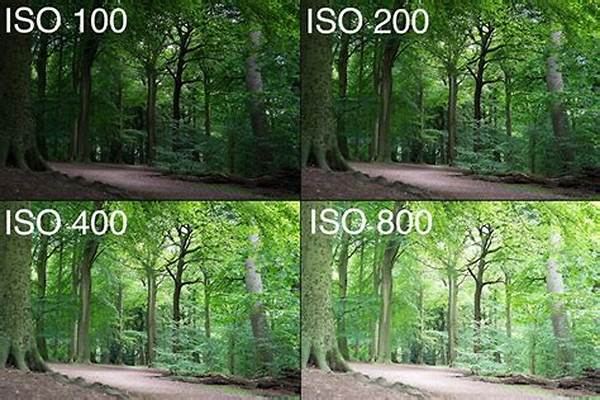
Imagine you’re out on a sunny day, camera in hand, ready to capture a breathtaking portrait against a stunning backdrop. But wait—your photos are either too bright, washed out, or way too dark! That’s where adjusting ISO for outdoor portrait quality comes into play. ISO, simply put, is your camera’s sensitivity to light. Lower ISO settings (like 100 or 200) can maintain image quality with less noise, making it great for bright, sunny conditions. On the flip side, if you’re shooting at dusk or in the shade, increasing the ISO (like 800 or 1600) boosts the camera’s sensitivity, allowing you to capture more light. But here’s the kicker: bumping up the ISO too much can result in grainy photos, so finding that sweet spot is key!
For those new to the game, start by experimenting with ISO settings. A good rule of thumb? Try using an ISO of 100 or 200 for bright lighting and inch up the ladder if you’re dealing with tricky shadows or dim twilight moments. Adjusting ISO for outdoor portrait quality might take a bit of experimentation, but once you get the hang of it, your outdoor portraits will thank you!
Tips for Adjusting ISO
1. Know Your Lighting Conditions: Before going for that perfect shot, assess the lighting. If it’s super sunny, lower ISO will do the trick. Cloudy? You might need a higher setting.
2. Balancing Act: Play around with other settings like aperture and shutter speed in tandem with your ISO. It’s a balancing act to get that dreamy portrait.
3. Noise Reduction: Cranking up the ISO can introduce noise. Many cameras have noise reduction features—use them wisely.
4. Test Shots: Don’t hesitate to take a few test shots with different ISOs to see what works best for the conditions you’re in.
5. Golden Hour Magic: Don’t forget to enjoy the golden hour! The natural diffused light makes adjusting ISO for outdoor portrait quality more forgiving.
Getting It Right: Adjusting ISO for Outdoor Portrait Quality
So, you’ve got a basic understanding of ISO and how adjusting it can affect your pics, right? Now it’s time to dig deeper. Adjusting ISO for outdoor portrait quality means being aware of all the variables at play. Light conditions are the major player, but don’t underestimate the impact of your camera’s strengths. Some cameras handle high ISO settings like a champ, minimizing noise while others might need a bit of finesse.
Think about this: when shooting an outdoor event, the lighting conditions won’t stay the same. One minute it’s bright and vivid, the next it’s softly lit. Adjusting ISO on the fly is your secret weapon. It’s like being a DJ, mixing tracks (or in this case, lighting conditions) to create that perfect symphony of an image. Your patience will pay off with a stunning shot!
Ten Quick Tips for Adjusting ISO
1. Be Prepared: Start with an ISO of 100 on sunny days.
2. Shade Strategy: Increase to 400-800 if shooting under trees or in shadows.
3. Action Shots: For movement, faster shutter speeds coupled with higher ISO are ideal.
4. Dawn & Dusk: Raise your ISO gradually as the light dims.
Read Now : Visual Framing In Media
5. Noise Aware: Monitor your image for noise when using high ISOs.
6. Histogram Help: Use your camera’s histogram for real-time exposure feedback.
7. Trial & Error: Don’t be afraid to take multiple shots with varying ISO.
8. Post-processing: Some noise can be reduced later in editing software.
9. Lower ISO Preference: Always aim for the lowest ISO that suits the lighting.
10. Practice Makes Perfect: The more you practice, the better you’ll get at quickly adjusting ISO for outdoor portrait quality!
The Balancing Act of ISO Adjustment
Adjusting ISO for outdoor portrait quality is somewhat of an art—akin to a juggling act. When you find the perfect setting, you get stunningly vibrant portraits. But balance is key. The right ISO will flawlessly capture details and colors, while the slightest misstep might render your masterpiece grainy. Take time to know your gear; some cameras are legendary at handling high ISO without losing details. Use bursts of manual settings instead of sticking to auto everything.
Moreover, outdoor lighting is an unpredictable beast. Clouds, open skies, reflection from the grass or water—there’s so much happening! When you’re in the field, capturing candid moments amidst inconsistent lighting, always be ready for quick ISO adjustments. Trust me, once you’ve mastered this, you’ll feel like photography royalty!
Chatty Tips for ISO and Good Vibes!
Yo, photo crew! Adjusting ISO for outdoor portrait quality is, like, totally what you need to up your game! Picture this: you’re on a fun day out, snapping shots of your besties. But hey, the clouds got in on the act—what a mood killer! Crank up your ISO to let more light in and keep your shots lit and lively!
Playing around with ISO settings is like finding the perfect playlist for a road trip. You want the right vibe—all the time. So, embrace the sneaky clouds, capture those perfect golden moments, and keep it real with ISO adjustments that speak your style. Your killer shots will be insta-ready in no time!
Wrapping It All Up
All in all, adjusting ISO for outdoor portrait quality is a must-have skill in your photography toolbox. As you become familiar with your camera’s settings, you’ll find that ISO isn’t just a number on your settings dial—it’s a dynamic ally in creating breathtaking portraits. Keep experimenting and practicing, and soon, adjusting ISO will become second nature. Whether it’s the dynamic light of the great outdoors or the serene shade beneath a tree, the perfect ISO setting brings out the best in every scene. Happy shooting!