Hey there, fellow photography enthusiasts! If you’re anything like me, you’re always on the hunt for ways to take your portrait game to the next level. One of the key elements that can make or break a portrait is the ISO setting on your camera. Getting the ideal ISO levels for portraits is essential for capturing those shots that truly stand out, making your subjects look amazing in any light condition. So, let’s dive in and explore how you can master ISO settings to create stunning portraits every time you hit the shutter button!
Read Now : Hairstyle Evolution Picture Gallery
Finding Your Perfect ISO
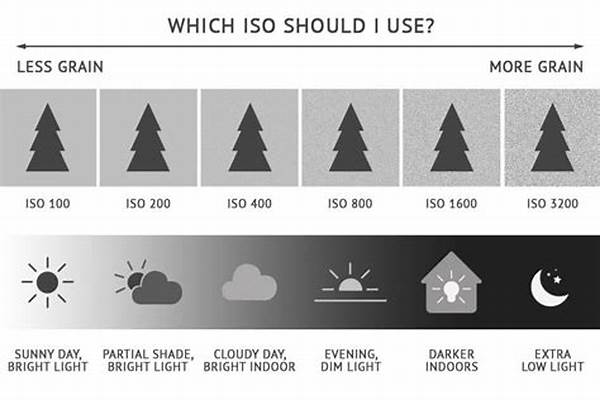
When it comes to achieving the ideal ISO levels for portraits, the first thing to consider is the lighting conditions you’re working in. Natural light is generally your best friend in portrait photography. In bright daylight, you can get away with using a lower ISO, around 100-200, to maintain sharpness and reduce noise. However, when you’re shooting indoors or in low-light conditions, you’ll need to bump up the ISO. Consider increasing it to 400-800 to keep your images bright without relying too heavily on flash, which can sometimes create harsh shadows.
Another thing to keep in mind is how your camera model affects ISO performance. Some cameras handle high ISO settings better than others, so it’s worth experimenting with your gear to see how it performs. If you notice too much grain at higher ISO settings, it may be wise to invest in a camera that’s known for excellent low-light capabilities. Keep playing around with different ISO levels for portraits, and before you know it, you’ll find the sweet spot that gives your portraits life and vibrancy, no matter the setting.
Lastly, remember that ISO is just one component of the exposure triangle, which also includes aperture and shutter speed. Balancing these three elements will help you achieve the perfect exposure for your portraits. If you end up with too much noise from a high ISO, you can compensate by adjusting the aperture or using a tripod to allow for a slower shutter speed. It all circles back to finding that ideal ISO level for portraits, which balances light and detail beautifully across various lighting situations.
Quick Tips for Perfect ISO Levels
1. Stay Low for Daytime: Keep ISO at 100-200 for daylight portraits to minimize grain and maximize image clarity. Ideal ISO levels for portraits mean less noise in bright settings.
2. Crank it Up Indoors: For indoor shots, an ISO around 400-800 will help maintain brightness without flash. This is especially useful when capturing ambient lighting effects.
3. Know Your Camera: Different cameras respond differently to high ISO settings. Ideal ISO levels for portraits vary across camera models, so test your camera’s limits.
4. Experiment with Light: Play around with natural and artificial light sources to see how they affect your ISO choice. Remember, ideal ISO levels for portraits often depend on creative lighting.
5. Noise Reduction in Post: If you’re stuck with a high ISO, consider post-processing software for noise reduction. It can help achieve that crisp, clean look sometimes lost with higher ISO levels for portraits.
ISO Levels and Your Creativity
Understanding the ideal ISO levels for portraits also allows you to unleash your creative side, playing with moods and lighting effects. Start by visualizing the feel you want—soft and romantic, or loud and dramatic. From there, determine how ISO can help achieve this vibe. Lower ISO settings can bring out softness in natural lighting, perfect for a dreamy portrait. In contrast, a higher ISO level can create a more dramatic scene, capturing every detail even in low-lit spots.
It’s crucial to test and see the direct impact of different ISO settings through your camera’s viewfinder or LCD. With instant feedback, you can adjust easily until the photo matches your creative vision. As you gain confidence with finding and using the ideal ISO levels for portraits, you become more adept at predicting exactly how your camera will handle different lighting scenarios. This experience gives you a keen edge in planning and executing the perfect portrait shoot.
Troubleshooting ISO Challenges
Balancing light and clarity can be tricky, but by leveraging the ideal ISO levels for portraits, you can overcome common hurdles. Here are some things to keep in mind:
1. Too Bright? Lower your ISO and adjust other settings to avoid overexposure.
2. Too Dark? Increase your ISO in tandem with widening your aperture for more light.
3. Blown Highlights? Utilize a lower ISO and spot metering to save those details.
4. Underexposed Shadows? Bump the ISO to reveal details without losing quality.
Read Now : Intuitive Watermark Creation Interface
5. Grainy Noise? Aim for noise reduction in post-processing if high ISO is unavoidable.
6. Fast-Moving Subjects? Higher ISO allows for faster shutter speed, capturing motion better.
7. Changing Conditions? Use auto-ISO for dynamic lighting environments, adjusting whenever necessary.
8. LCD Check: Always review images on your LCD screen for real-time ISO assessment.
9. Use Histogram: Analyze the histogram for balanced exposure metrics.
10. Practice Makes Perfect: Keep shooting under varied conditions to refine your skills with ideal ISO levels for portraits!
Nailing the ISO Game
Alright, portrait aficionados, let’s get real about mastering those ideal ISO levels for portraits. We’ve touched on understanding lighting, adjusting camera settings, and tweaking post-processing techniques, but what’s the deeper scoop here? Well, nailing the ISO game involves not just technical know-how, but also a dash of creativity and a heaping teaspoon of patience.
Imagine shooting a portrait session during golden hour, the light is just perfect, hugging your subject in a warm glow. You’re working with an ISO of 200, capturing the perfect amount of light without sacrificing any details. That’s the magic spot, right? Now, envision a different scene—an intimate shoot lit only by candlelight. Here, you might need to crank the ISO up to 1600, but you know it’s worth it to capture the cozy vibe. It’s these storytelling elements that the ideal ISO levels for portraits bring forth, enhancing tonal range and preserving natural texture.
Don’t stress if you don’t hit perfection right off the bat. Learning these settings takes some experimentation. Test shots under diverse lighting setups, adjusting the ISO to match the scene. Review your images critically—where does grain enhance the image, and where does it detract? Use these experiences to hone your intuition for choosing ISO settings on the fly. In time, finding the ideal ISO levels for portraits becomes second nature, making every photo opportunity a chance to create something extraordinary.
Slang Style on ISO Levels
Okay, listen up, fam! Time to spill the tea on the ideal ISO levels for portraits. You want your portraits to pop, right? Well, it’s all about nailing that ISO. On a sunny day, stick to low ISO, like 100 or 200. Your pics’ll be crispy AF. But, if it’s moody vibes indoors, you’ll probs need to dial it up—think 400 to 800 zone.
Now, don’t go too cray-cray with the ISO, or you’ll be seeing grain like it’s a retro filter. Test out how your camera handles noise; some churn out bomb shots even at high settings. It’s low-key about balancing that ISO with lighting hacks. You feel me? Master this, and your portraits will be straight fire, showcasing looks that slay in any light.
Recap: ISO Insights
Let’s roll back through the highlights of mastering ideal ISO levels for portraits. Securing that ISO balance not only amps up your portrait game but also unlocks a world of artistic expression. We’ve covered how ISO plays well with different lighting—from the predictable sunshine to those elusive, subtle indoor setups. Eye for detail? That’s the heart of leveling up your portrait game.
Remember to always check your gear’s ISO tolerance during shoots, aiding your quest for that dream shot. Persistence leads to masterpieces; don’t give up when the ideal ISO levels for portraits prove elusive. Plus, capturing candid moments with the perfect ISO setting will have your portfolio looking legit. Keep experimenting, adjusting, and finding inspiration everywhere because every clicked frame is a step closer to brilliance!