Hey there, fellow tech aficionados! Whether you’re binge-watching your favorite series or indulging in a thrilling gaming session, nothing beats the beauty of crystal-clear visuals. Sometimes, though, those default settings on your TV or monitor just don’t cut it. That’s when it’s time to roll up your sleeves and fine-tune picture clarity settings for that perfect viewing experience. Get comfy, grab a snack, and let’s dive into the world of pixel perfection.
Read Now : Free Video Branding Apps
Understanding the Basics of Picture Clarity
So, what’s the big deal with picture clarity anyway? Well, if you’re a stickler for sharp images and vibrant colors, then mastering the art to fine-tune picture clarity settings is crucial. Simply put, picture clarity involves adjusting the settings on your display device to enhance sharpness, contrast, brightness, and color accuracy. Think of it as giving your favorite movie or game a fresh coat of paint.
Now, when we fine-tune picture clarity settings, it’s not just about cranking up the sharpness dial to the max. You want to strike a balance where the details pop, but still look natural. Too much sharpness can result in an unpleasant, artificial look. Meanwhile, adjusting contrast and brightness can help bring out those deep blacks and brilliant whites, making everything look more dynamic. And let’s not forget about color settings. You’ll want those hues to be as vibrant and true-to-life as possible. It’s about turning your viewing experience into a visual feast, and once you achieve that, you’ll never want to watch TV on factory settings again.
Tips for Fine-Tuning Picture Clarity Settings
1. Start with Default Presets
Before diving into tweaks, try exploring preset modes like “Cinema,” “Game,” or “Vivid.” They can do a pretty decent job of optimizing clarity right off the bat.
2. Adjust Sharpness Sensibly
While it’s tempting to max out sharpness for enhanced detail, subtle adjustments often maintain a more natural look when you fine-tune picture clarity settings.
3. Play with Contrast and Brightness
Finding that sweet spot for contrast and brightness can significantly improve clarity. It’s all about balancing light and dark for a richer image.
4. Enhance the Colors
Color settings can make or break your display. Fine-tune picture clarity settings here by ensuring accurate and vibrant colors without washing them out.
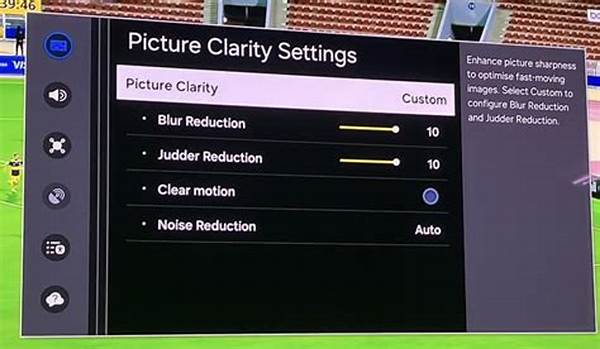
5. Reduce Picture Noise
Some displays come with a noise reduction feature. Use it to remove unwanted fuzziness and create a cleaner image overall.
Practical Guide to Picture Clarity Settings
The first step in fine-tuning picture clarity settings is understanding your TV or monitor’s interface. Every brand has its own menu style, but they all share common settings like brightness, contrast, and sharpness. Once you locate the picture settings, take a peek at the available preset modes. These modes offer a variety of optimized settings catered to different activities like watching movies, sports, or gaming.
After selecting a preset that closely aligns with your viewing habits, it’s time to personalize the experience even further. When you fine-tune picture clarity settings, focus on individual components like sharpness, which can enhance the edges of objects, giving a crisper appearance. Be careful, though—too much sharpness can make the image look unnatural. Then there’s contrast, which improves the differentiation between light and dark areas, injecting depth into your visuals. Wrapping it up with color and hue adjustments ensures that everything appears lively and true to life, creating an inviting viewing atmosphere.
Common Issues and Their Solutions
When you dive into fine-tune picture clarity settings, there are a few common hiccups you might encounter. But don’t worry, I’ve got your back with some easy fixes!
1. Over-Sharpness: If your picture looks overly grainy, dial down the sharpness to maintain a smooth, lifelike appearance.
Read Now : User-friendly Free Watermarking App Recommendations
2. Washed-Out Colors: Boost color saturation for punchier hues if the image appears dull.
3. Too Dark or Too Bright: Adjust brightness and contrast for better balance and improved visual clarity.
4. Motion Blur: Enabling motion smoothing features might help reduce unwanted blur in fast-paced scenes.
5. Image Noise: Tweak noise reduction settings to clean up images and achieve crispness.
These quick fixes can make a world of difference when you fine-tune picture clarity settings for the best viewing experience.
Why You Should Fine-Tune Picture Clarity Settings
Now, why bother to fine-tune picture clarity settings, you ask? Well, diving into those settings can do wonders in revolutionizing your viewing adventures. Screen adjustments might feel daunting at first, but trust me, the results are oh-so worth it.
First up, let’s talk immersion. The beauty of fine-tuning is the rewarding experience of your favorite shows, movies, or games coming alive in stunning detail. Every intricate detail and vibrant color is amped up and ready to wow you. Plus, fine-tuning helps to reduce eye strain. When you have the right settings, your eyes don’t have to work overtime, meaning more binge-watching without fatigue!
Imagine watching a nature documentary where the greens of the forest and the blues of the ocean pop like never before. Or how about gaming with that competitive edge where spotting every detail is the difference between victory and defeat? So next time you sit down, don’t hesitate to take a moment and fine-tune picture clarity settings—your eyes and content will thank you for it.
Fine-Tuning Picture Clarity with a Bit of Flair
Let’s talk picture clarity, folks! If you’re serious about watching shows with the best image quality, then you’ve gotta fine-tune those picture clarity settings. Dive right in and start tweaking that brightness because who wants to squint during movies, right?
Now, most of you might be tempted to crank up that sharpness, but easy does it! Too much sharpness and you’re looking at a Picasso instead of a portrait. The secret sauce is balance—think brightness, contrast, and, yes, those colors too. It’s a whole package, like a well-cooked meal: each ingredient is essential and needs to be just right.
Also, ever noticed how annoying noise is on a big screen? It’s the villain of clarity, for sure. Tune it out with noise reduction features, and your picture will thank you. So, grab your remote, go bold, and make your viewing party a visual spectacle! Keep calm and fine-tune those picture clarity settings like a pro.
Summing Up the Art of Fine-Tuning
In this tech-savvy world, why settle for less when you can fine-tune picture clarity settings to transform your viewing experience? Remember, the first experiment with preset modes before tackling the deep dive into manual settings. Those trusty modes lay the groundwork for your personal touch on aesthetics.
And while it may seem like rocket science at first, each tweak slowly nudges your screen into the “just right” zone. You’ll discover newfound joy in details from intricately woven costumes to breath-taking landscapes—all popping with color and contrast in the right measure.
The journey to perfect clarity isn’t just technical; it’s an art form that weaves together precision and creativity. Once you get in the flow of it, there’s no turning back—every show becomes a visual masterpiece, bursting with life when you fine-tune picture clarity settings. Happy tuning, fellow screen adventurers!