Hey there, fellow photography enthusiasts! If you’ve ever been curious about how those dreamy portrait shots come to life, then you’re in the right place. One of the lesser-known secrets to capturing those perfect portraits is mastering the art of ISO adjustment. In this article, we’ll dive deep into the techniques for ISO adjustment in portrait photography. Whether you’re just getting started or looking to refine your skills, keep reading. We’ve got some juicy tips that can help you level up your portrait game!
Read Now : Artistic Vision In Smartphone Photography
Understanding the Basics of ISO in Portrait Photography
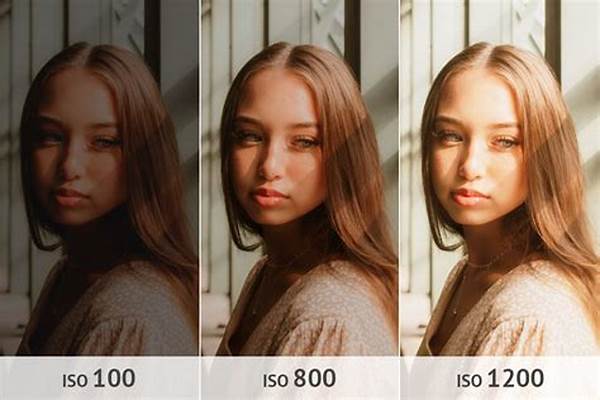
Alright, let’s kick things off with a quick rundown of what ISO actually does. In the simplest terms, ISO is all about the sensitivity of your camera’s sensor to light. The lower the ISO number, the less sensitive it is to light, which usually means less noise in your image. But when you’re shooting portraits, especially in less-than-ideal light conditions, adjusting your ISO is like having a magic wand to banish those shadows and highlights.
Now, let’s get into how you can actually use these techniques for ISO adjustment in portrait photography. First, always start with the lowest possible ISO setting for your camera. This helps in maintaining image quality and producing smoother skin tones. But here’s the trick: as you increase the ISO to handle lower light situations, be mindful of the noise it can introduce. You don’t want Aunt Sally’s lovely face to look like a grainy mess!
When you find yourself indoors or in dim light, don’t shy away from cranking up the ISO a bit. Modern cameras handle high ISOs pretty well, and sometimes, achieving the right exposure in your portraits means embracing a little noise. Remember, there are also post-processing techniques to reduce noise if it gets too noticeable. The key is to experiment with different ISO settings in varied environments to see what works best for you. Practice makes perfect!
Practical Tips for ISO Setting in Portrait Photography
Want to nail the perfect ISO every time? Here’s a quick guide of techniques for ISO adjustment in portrait photography:
1. Start Low – Always begin with the lowest ISO setting.
2. Assess the Light – Check your lighting conditions and adjust accordingly.
3. Use ISO Auto Mode – Let your camera give a helping hand in fluctuating light.
4. Experiment – Try different settings to learn the effects on skin tones.
5. Post-processing Magic – Don’t forget you can fix things later with editing software.
Mastering ISO Techniques for Portraits
Diving deeper, let’s break down the importance of understanding your camera’s ISO capabilities. Newer models boast impressive ISO ranges, and knowing how to utilize these is key. One of the techniques for ISO adjustment in portrait photography is leveraging your camera’s auto ISO feature. This setting can be incredibly helpful when you’re working in a situation with variable lighting, like events or outdoor shoots.
You might wonder, what’s the magic number? Well, there isn’t a one-size-fits-all answer. Each camera and scene can influence the ideal ISO. Practice shooting in different environments, noting how adjustments impact your portraits. Pay special attention to how skin tones translate across various ISO settings, and learn to trust your instincts. Over time, you’ll develop a keen sense for when to tweak those settings for the best results.
Ten Key Guidelines for ISO Adjustments in Portrait Photography
Here are ten essential tips to refine your techniques for ISO adjustment in portrait photography:
1. Know Your Camera – Different models handle noise differently.
2. Adopt Auto ISO – Perfect for erratic lighting.
3. Mind the Noise – Experiment to find your acceptable noise threshold.
4. ISO and Motion – Balance between ISO, shutter speed, and aperture.
Read Now : Best Free Image Watermark Tool 2023
5. Light and Shadows – Master your lighting setup.
6. Noise Reduction Software – Embrace post-processing tools.
7. ISO Workshops – Attend workshops for practical learning.
8. Community Insights – Learn from online forums and communities.
9. Review and Revise – Always analyze your shots post-session.
10. Constant Practice – Perfect your skills with regular practice.
The Artistry of ISO in Capturing Portraits
So why all the fuss about ISO in portraiture? Well, understanding ISO goes beyond just setting your camera right—it’s about mastering the soulful essence of your photography style. Embracing techniques for ISO adjustment in portrait photography allows you to cleverly maneuver through different lighting scenarios, ensuring that you’re always prepared. This skill is particularly useful when natural light takes a backseat or when artificial lighting isn’t available.
But let’s get real—how do you know what setting to use in each scenario? You don’t always know, and that’s alright. Achieving technical and creative harmony takes time and practice. Accept that learning is endless, and remain open to exploring novel setups. Digging deep into your creative toolkit and leveraging ISO effectively can turn uncertainties into power moves. It’s the artistic journey of trial and error that ultimately distinguishes your style from the crowd.
Mastering ISO adjustments liberates you, enabling you to capture the exact mood you’re aiming for while optimizing every frame’s exposure and detail. Remember, the adventure that awaits you isn’t just about technical mastery; it’s about finding the right intersection between technique and creativity.
Slang-written Techniques finesse for ISO Adjustment
Yo, real talk: wanna ace those portraits? Understanding the techniques for ISO adjustment in portrait photography is legit like crafting your own magic potion. It’s all about not freaking out in low light—play with those ISO digits. With each click, you’re drawing closer to finding your signature groove. So grab your camera, bust out those settings, and click away!
ISO’s your homie. When the night serves up shadows, crank it up! But keep it chill—don’t let noise crash the party. Experiment till you get that sweet spot. It’s about the vibe, the energy of trial and errors, and heyy, the guts to keep snapping. Embrace those learning curves, and your shots will be all the buzz!
Wrapping Up ISO Techniques for Portrait Photography
To wrap it all up, mastering the techniques for ISO adjustment in portrait photography isn’t just another box to tick on the way to becoming a skilled photographer. It’s an essential part of your creative arsenal, enabling you to adapt to various lighting conditions with confidence and finesse. Embracing ISO techniques allows you to push the boundaries of what’s possible with your portraits, from maintaining those delicate skin tones to capturing the twinkle in someone’s eye, even when the light isn’t playing fair.
Through constant experimentation, you not only learn what works best for your personal style but also enhance your ability to adapt in the field. As you continue to work with different lighting scenarios, you’ll become more versatile—an invaluable trait for any photographer. Remember, it’s all about balancing creativity with technical know-how. Your journey with ISO adjustments in portrait photography should be seasoned with curiosity, patience, and lots of practice. Keep exploring, keep evolving, and soon enough, your work will shine through, literally and figuratively!


