Hey there, creative souls! If you’ve ever dabbled in photography or simply stumbled upon those eye-catching Instagram grids, you know how mesmerizing a perfectly arranged flat lay photo can be. But behind every drool-worthy pumpkin spice latte shot or glistening makeup spread, there’s a secret sauce: awesome lighting. That’s right, folks—a nifty flat lay lighting setup guide can make or break your pics! Whether you’re a newbie or a seasoned snapper, today we’re diving into all things lighting so you can nail those shots right in your cozy corner!
Read Now : Personal Branding Through Photography
Understanding the Basics of Flat Lay Lighting
When it comes to flat lays, good lighting is your best friend. You don’t need expensive or fancy gear to get it right. The key lies in natural light; think soft but bright—preferably filtering through a window. This kind of lighting casts gentle shadows and enhances the subject’s details. But, clouds occasionally love to mess with us, casting gloomy shadows at the worst times (thanks, clouds). Our flat lay lighting setup guide swoops in to save the day. Pair natural lighting with some DIY reflectors, like a trusty white foam board or one of those gold/silver cardboard pieces everyone swears by. Reflecting light back onto your subject helps avoid those dark corners and brings life to the colors. Happy snapping!
Essential Tools for Flat Lay Lighting
1. Natural Light Source: Your good old window!
2. Reflectors: Use foam boards to bounce light.
3. Diffusers: Gentle sunlight filtering? Thank you!
4. LED Panels: Control those shadows like a pro.
5. Portable Ring Lights: For extra pizzazz.
Now that you’ve got your flat lay lighting setup tools, you’re ready to conquer any flat-lay scene. Whether it’s moody books or vibrant fruits, tools like reflectors and LED panels are lifesavers. And don’t overlook the humble window—it’s one of the best light sources for capturing beautiful compositions and showcasing intricate details in your shots.
Advanced Lighting Techniques for Flat Lay
Alright, lighting wizards—feeling comfy with basics and ready to elevate your game? Welcome to the more advanced steps of our flat lay lighting setup guide. First up, consider the golden hour effect. You know, that perfect sliver of time where everything looks glowy without needing an Insta filter? Recreating that dreamy ambiance can be as simple as placing your setup near a window and shooting during early morning or late afternoon.
Another killer technique is playing with shadows! Shadows add an artistic flair and dramatic contrast to your flat lays. Experiment by angling light from above or try side lighting for more intense shadows. Shadows can work wonders, especially if you’re including textured elements like fabric. Trust this flat lay lighting setup guide and have fun with creative shadow control to roll out those groovy vibes!
Tips and Tricks from the Flat Lay Lighting Setup Guide
1. Consistency is Key: Stick to a lighting schedule for uniform shots.
2. Manual Mode: Master your camera settings!
3. Natural and Artificial Blend: Use both light sources for balance.
4. Softening Shadows: A tissue paper over lights can help.
5. Overhead Angling: Get that direct light action going.
Read Now : Budget-friendly Home Photo Project Ideas
6. Watch for Color Casts: Avoid tinted lights like yellow bulbs.
7. Show Texture through Shadows: Textured items pop with side lighting.
8. Backdrops Matter: Consider shades that complement lighting.
9. Shoot in RAW: Increase post-edit flexibility.
10. Invest in a Light Meter: It’s a game changer for precision.
Your flat lay lighting setup guide offers a treasure trove of tricks to step up your photo game. Consistency in lighting not only creates cohesive content but keeps editing minimal. Blend lights, maintain manual control, and most importantly—have fun! There’s no one-size-fits-all; let creativity steer the ship while this guide is your reliable co-captain.
Overcoming Common Flat Lay Lighting Challenges
Let’s face it, things don’t always go as planned. But fear not—our flat lay lighting setup guide has your back. Too much surface glare? Try diffusing light with sheer fabric or simply relocate your setup closer to natural light. Annoying reflections can show up in the most unexpected places, especially on glossy items. Combat this by angling lights and tweaking positions to dodge those unruly reflections.
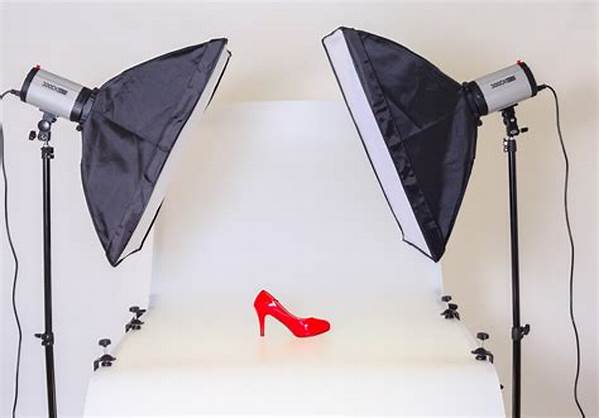
And what about those bothersome shadows? Don’t let them steal the show! Use softbox lights to create even light distribution or reflect light strategically to soften shadow lines. A homemade flag (think cardboard curtain) can cut out unwanted light, bringing more control. By understanding challenges and arming yourself with the right techniques, you’ll soon realize that no flat lay setup is too daunting!
Getting Crafty with Unique Flat Lay Lighting
Yo, creative peeps! Let’s chat about gettin’ all artsy with your flat lay lighting setup guide! So you know the rules, now let’s break ‘em—just a bit. Play with unusual light sources like fairy lights or colored LEDs for magic vibes. Drape them around the scene or hang them overhead for whimsical glows.
Wanna go full drama? Use flashlights to sketch glow patterns or shadows. It’s like painting with light. Woot! For extra fun, include prisms or glass objects to sprinkle sparkly reflections. You can totally make your flat lays stand out by shooting mind-blowing, other-worldly scenes. The sky’s the limit, friends; let this flat lay lighting setup guide unleash your inner Picasso.
Summary of the Flat Lay Lighting Setup Guide
As you venture into the world of flat lay photography, remember that lighting is your BFF. Our flat lay lighting setup guide is designed to smooth out your journey—from grasping the basics to nailing fancy techniques. Let that natural light fall in love with foam boards and reflectors, and develop consistency by shooting in similar lighting conditions.
Think of lighting as your secret weapon to make photo subjects pop with life. Combining natural and artificial sources, controlling shadows, and working with regular themes are key in this flat lay lighting setup guide. Ultimately, just have fun and keep experimenting to discover what works best for your unique style. Whether it’s capturing your snazzy lunch or glamorous makeup stash—lighting can transform anything into a visual story that speaks directly to the viewer. Happy snapping, friends!